Edit/Compose
There may be sections of your media that you want to delete, or audio that is hard to hear and needs to be enhanced, or there is a need for a descriptive title that you want to add. Here are a few basics. But first be sure that you are in cut and paste mode (this is the default) by checking to verify that you see a gold color around the “I” i-beam mode icon as in the figure above. If the arrow to the left is gold, you are in drag and drop mode so switch to cut and paste by clicking on the “I” instead.
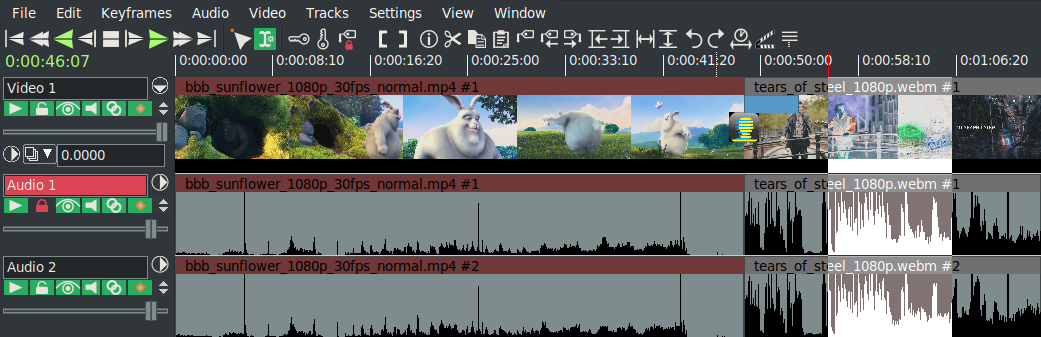
Figure A.6:
From left to right: Audio 1 is disarmed – BandSlide transition in Video 1 – A highlighted section.
|
|
- You should look at the Edit pulldown - 2nd from the upper left on the main timeline to see the
most common options to use. The first option in the list is Undo followed by a terse comment of
the last operation that you performed that can be undone.
- To delete a section of video/audio is described next. Various ways to do that are available but the
easiest is to move your mouse and left click at the beginning of the section you want to delete on the
timeline and while holding down the left mouse button, drag to the end of the section to be deleted.
When you do this, a white colored highlighted section becomes visible. Use the Edit pulldown and
choose the split/cut option to cut out the highlighted area (note the shortcut of "x"). Remember if you
cut the wrong thing out you can always use the Edit pulldown to Undo that.
- To add a transition where there is deleted section which may make your video look disjointed, do
the following. Go back to the Resources window in the bottom right hand corner. Change to
Video Transitions by highlighting that underneath the word Visibility. Highlight a transition like
BandSlide with the left button mouse click, hold down and drag to the video track and when you see
a white colored box around the area that you deleted above, drop the icon. Right mouse click the
icon on the track to vary some parameters like length.
- To insert another clip from a different video, first you have to load the other video on another track.
Go to File pulldown again and choose the Load files option. Type in a directory at the top again and
erase any specific file that you may have chosen previously in the bottom 2 textboxes. It is very
important to now change the Insertion strategy to Append in new tracks or you will write over
your current work. But if you make this mistake, you can use the Edit pulldown and Undo that!
- Once the new video is on the track below your current work, you want to work with only this new
track, so disarm your other tracks by looking to the left of each track’s timeline and click the 2nd
button beneath the track name, for example Video 1 or Audio 1. The track name textbox will turn
red to remind you that the track has been disarmed. The boxed area is called the patchbay.
- Move to the area you want to make a clip of on your newly loaded track, hold down the left mouse
button and drag the area to be made into a clip which will turn the color white. Remember, you
disarmed the other tracks so only this track is relevant at this time. On the second line of the main
window to the right of the transport buttons, are action buttons and as you mouse over them a
colored tooltip explains its purpose. Find the one that says To clip which is on the right
hand side of the right bracket symbol.
- Click on To clip and a small window comes up which you can comment in, but you do not have
to, so just click on the green checkmark and now you will have a clip.
- Disarm that new track and re-arm your original tracks so you can go back to working on them
- Move your cursor to the spot in your original video where you want to insert the clip. Make a
Split with the Split | Cut option.
- Go to the Resources window and under the word Visibility, highlight Clips so you can see your
recently created clip in the box to the right. Highlight that clip and drag it to where you did the
blade cut and drop it in.
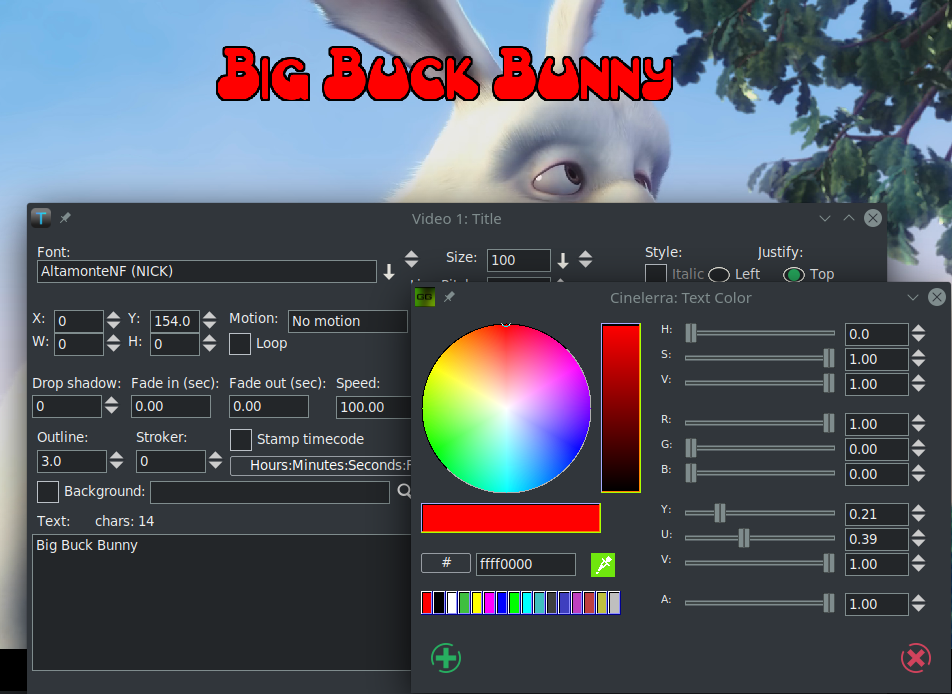
Figure A.7:
Compositor + Title menu for setting parameters + the Color Picker.
|
|
- To add a Title or any wording you will use the Title plugin. In the Resources window, under the
word Visibility, highlight Video Effects. In the box to the right, many plugin icons appear. Scroll
to the right using the scroll bar at the bottom of the Resources window to locate Title. Highlight the
Title icon and drag/drop to your video track. By now your video track may be in sections as you
deleted, added blade cuts, and inserts so where you drop the Title icon will be surrounded with a
white colored box. It will take effect in that entire area so you may want to highlight a section as
usual with left mouse click on the timeline and drag to the end of the desired area.
- Right click on the brown colored bar that appeared below your video track to get to options and
then left click on Show to get the Title window to appear.
- Now for the fun part. First type in some words in the bottom large text box just to see what it
does. There are so many variable parameters here and they are a lot of fun to play around with.
- You can dismiss the Title window when finished BUT be sure to leave the brown colored Title bar
on the track. And if you enabled the drag feature, you should disable it so you do not forget.
- Right mouse click on the bottom Text box to see many more interesting parameters.
The CINELERRA-GG Community, 2021
https://www.cinelerra-gg.org