Subsections
Audio/Video sync via Waveform
Multi-camera footage of a single event can have various shots starting and ending at different times. So when the footage start times are different, you can use the mixer audio to synchronize the clips on the timeline. The program algorithm attempts to find and align automatically the waveforms of the media.
Synchronizing multiple camera videos based on audio tracks can be done with CINELERRA-GG easily enough with the Window
→ Mixers...
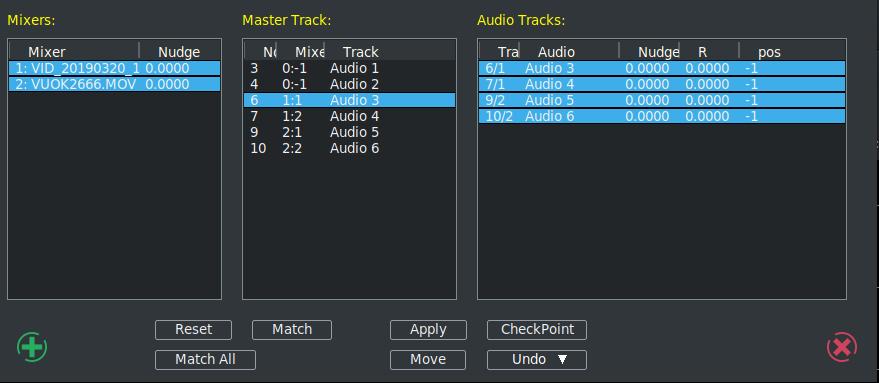
→ Align mixers option. Align mixers brings up a window displaying your mixers, the currently selected Master Track, and a list of all of the Audio Tracks (figure 6.12). There is a limit of 32 audio tracks per each mixer (that should be enough!)
Figure 6.12:
Align Mixers window
|
|
Two different methods of aligning the audio for mixers are available. They are most easily referred to by the button that is pressed – Match and Match All. There are also 2 methods of activating the alignment – Apply and Move.
Match consists usually of the next set of steps to take advantage of this feature:
- Load your camera media with insertion strategy of resources only
- Highlight in the Resources window, all of the media you want to mix.
- Right mouse button on one of the media and click on Open Mixers; all mixer windows come up.
- To arm the created mixer tracks and related audio tracks. They are automatically placed on the timeline disarmed. This is right for multi-cam but not for audio sync.
- Provide a small target audio pattern on the Master Track for syncing by marking with the In/Out points ([ and ]). NOTE: When choosing between the audio tracks to align the one that will have to work as Master, we must rigorously use the one with the right-most synchronization peak. This is because the Master track will be started at the beginning of the timeline. If during alignment the other tracks should move further to the left than the Master, they will be truncated at 00:00:00:000, finding no more space available, and will be shortened with loss of footage for the next multi-cam
- Make a selection on the timeline in which to look for the pattern. Left mouse click, then drag select and highlight a search time domain.
- Use the Window
→ Mixers...
→ Align mixers to bring up its dialog window.
- Highlight in the first listbox, the Mixer number you want to align. Click on Match. This will take a few seconds so watch the rendering time percentage on the lower right hand side zoom panel. The buttons will be ghosted out until finished. Now note the changed values in the Audio Tracks listbox.
- If you are satisfied with the calculated Nudge values – that is they are very close to 1.0 – in the Audio Tracks listbox and the audio track selected as the Master Track in the Master Track listbox, hit the Apply button.
- If you plan on performing more alignment tasks, click on Checkpoint so you can go back to a previous step in case you make a mistake.
- Last, click on the OK green checkmark or to cancel click on the red X. Or just close the gui.
- To disarm the mixer tracks and related audio tracks for the next multi-cam operations.
is used to start over with the current session data, not an undo. This means you can use the match repeatedly to refine alignments. All of the Audio Tracks listbox values will be reset.
provides a method to create checkpoints that save the current state. This is especially helpful while learning or doing more complicated operations where you might make a mistake or do not like the results and need to get back to a previous state.
is used to put the media back to a previous state on the timeline. If you choose start over the session will reload with the original, before any changes were applied. You can also go back to any of your previous checkpoints that you created earlier which are listed there, such as chkpt 1.
is used when you have several mixers, instead of only picking 1 to match, it picks the best match for EACH of the mixer tracks based on a single master track. So when you hit Apply, each track might move differently. You do not set In/Out points but you have to make a selection within which to match.
button will apply the nudges that were generated during the Match or Match All execution (figure 6.13).
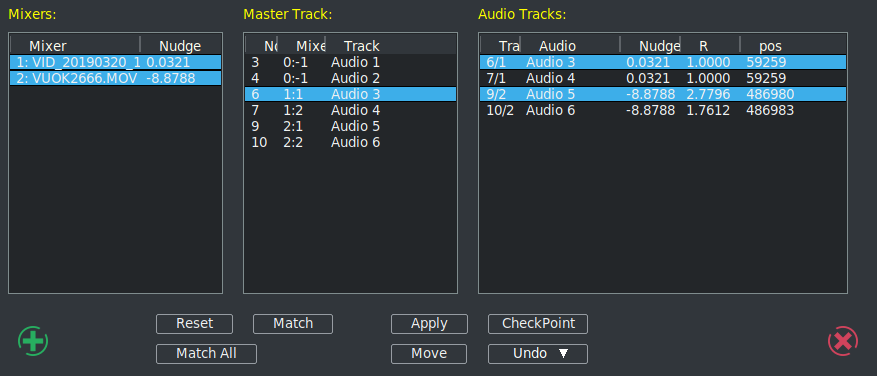
Figure 6.13:
Aligned mixer window after "Match". Note the Nudge amounts above.
|
|
is very handy when you are using mixers, if you have an edit somewhere that you need to fix specifically without moving any of the other track pieces. In this case you have to select a section (like you do a group, but do not make a group), generate a match, and then you can just Move that set only – everything else stays where it is at its current location (figure 6.14).
Figure 6.14:
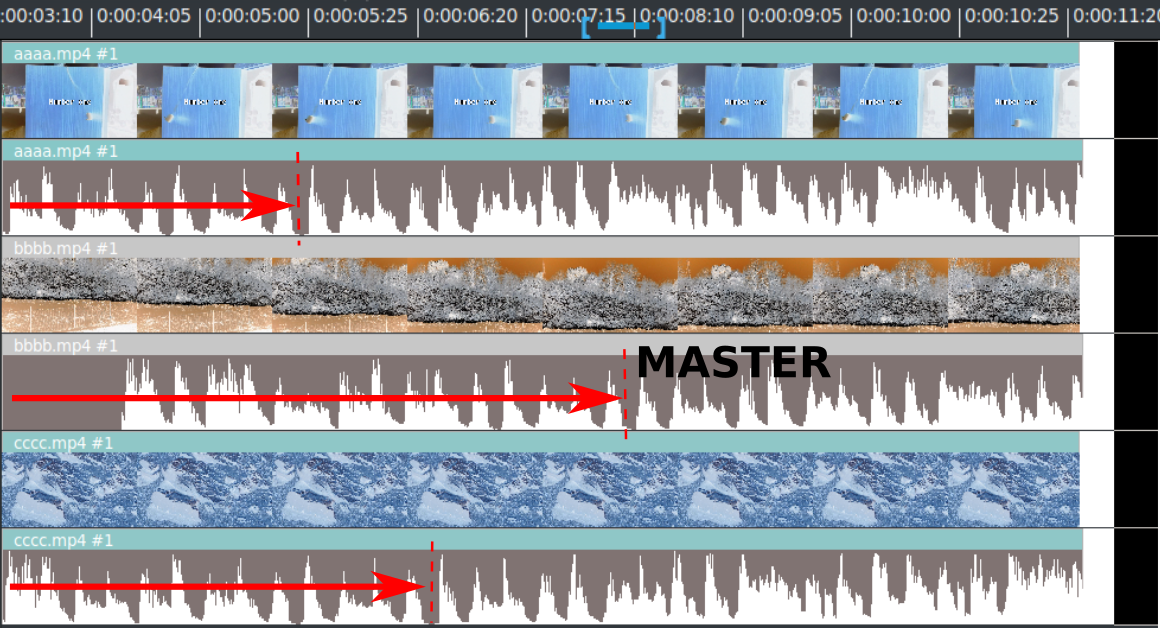
Match setup for aligning by audio. Note that [ ] are set over a sample waveform highlighted selection that includes that.
|
|
More detailed information follows about how this all works and the information in the dialog window. It is important to know that the result of the calculation is best match but you can still override the selections if you decide there is a better one. The dialog window is split into 3 sections:
- Mixers lists the mixers that are active by highlighting them all initially. You can decide that you do
not want 1 or more mixers to be used in the correlation calculation by un-highlighting the one(s) that should not be used. In some cases you have to have at least 2 in order to align audio.
- Master Track lists each of the audio tracks currently loaded for all of the mixers. You can decide to highlight a different audio track to be used as the master for correlation, but only 1 can be used. Remember to use the track with the right-most synchronization peak as the Master.
- Audio Tracks lists each of the mixer audio tracks. Again, you can highlight a different set of which
mixer audio tracks that you want to use for the waveform correlation. Any audio tracks that are not
highlighted, that is turned off, will not be considered in the correlation calculation.
The corresponding input position is determined by track input correlation.
The letter "R" in the Audio Tracks listbox represents the correlation value. R = 1.0 designates that if both the pattern and the matching section were in the highlighted area, they are completely correlated – this is a good self-test to check.
Nudge = 0.0 means just that.
The header pos stands for the timeline position. When the Apply button is pressed, only the Mixers listbox is relevant at that time.
The Mixer with the master track generally does not move, everything else will be lined up (figure 6.15).
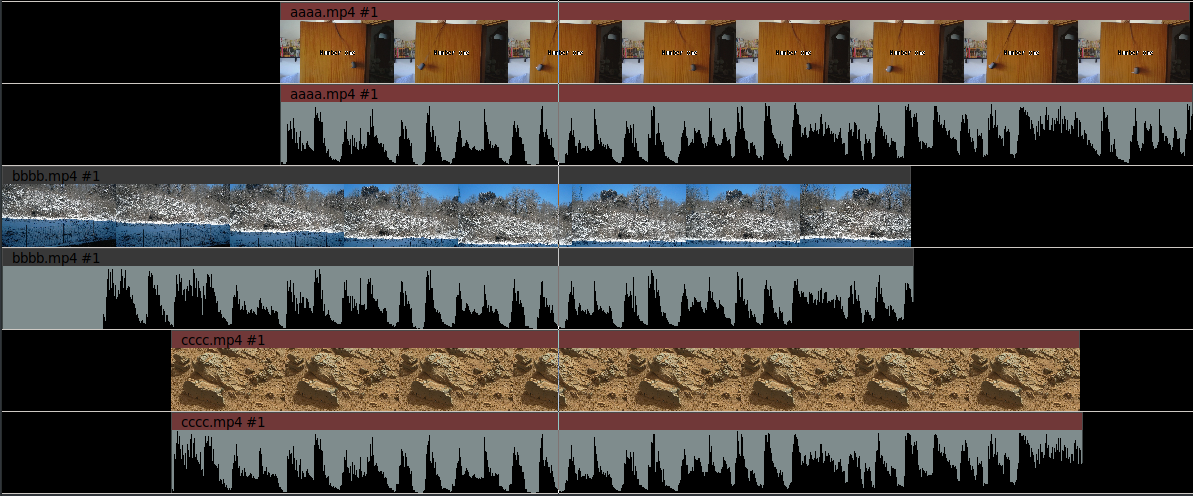
Figure 6.15:
An audio Match is complete. Note the waveform is aligned.
|
|
Match All option basically consists of the following steps:
- Highlight the Mixer to use in the Mixer listbox.
- Highlight the Master Track you want to use in the Master Track listbox.
- On the timeline, mark your selection on the Master Track.
- Click on the Match All button.
- Note the nudge values to see if they make sense, and if so, press Apply.
Match option basic steps (just for comparison with Match All):
- Set the In/Out points [ ] of the target.
- On the timeline, mark your selection.
- Click on the Match button.
- Note the nudge values to see if they make sense, then press Apply (or Move when doing a group).
The CINELERRA-GG Community, 2021
https://www.cinelerra-gg.org