Subsections
Chroma Key (Avid)
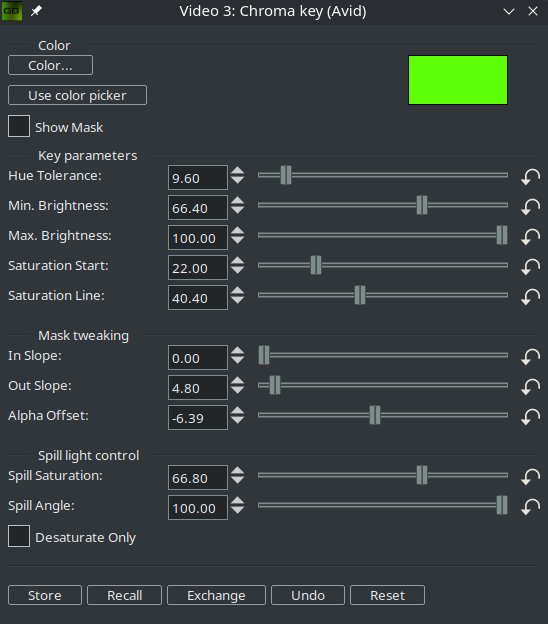
Chroma Key (Avid)9 (figure 10.30) replaces a color with another color or transparency using HSV variables. It is frequently used to remove a color from a video to composite with another image. This process is generally referred to as green screen or blue screen process because of the background color that is keyed out. More information is at: http://en.wikipedia.org/wiki/Chromakey.
Figure 10.30:
Windows config for Chroma Key (Avid/HSV)
|
|
Requirements
The subject in the timeline video should have a good background. The lighting is crucial and good lighting during production will save you time with much less effort than in post-production. Another tip is to use a low-compressed, intraframe codec with as high a color depth as possible. In case of YUV-type source, it is better to have subsampling 4 : 4 : 4 or 4 : 2 : 2.
Here we assume that we have a good video, filmed on green or blue screen that we want to use. Important: make sure you are using a color model that has an alpha channel, such as RGBA8, RGBAFloat, YUVA8. To change color model, go to Settings
→ Format
→ Color Model. Any manipulations with alpha masks in CINELERRA-GG require a bottom track with some opaque background, otherwise the transparent holes are displayed as if the same track without transparency is located under it.
Usage
As in any other effect, drag it to the timeline in the main window. You can tweak each parameter in order to improve the keying.
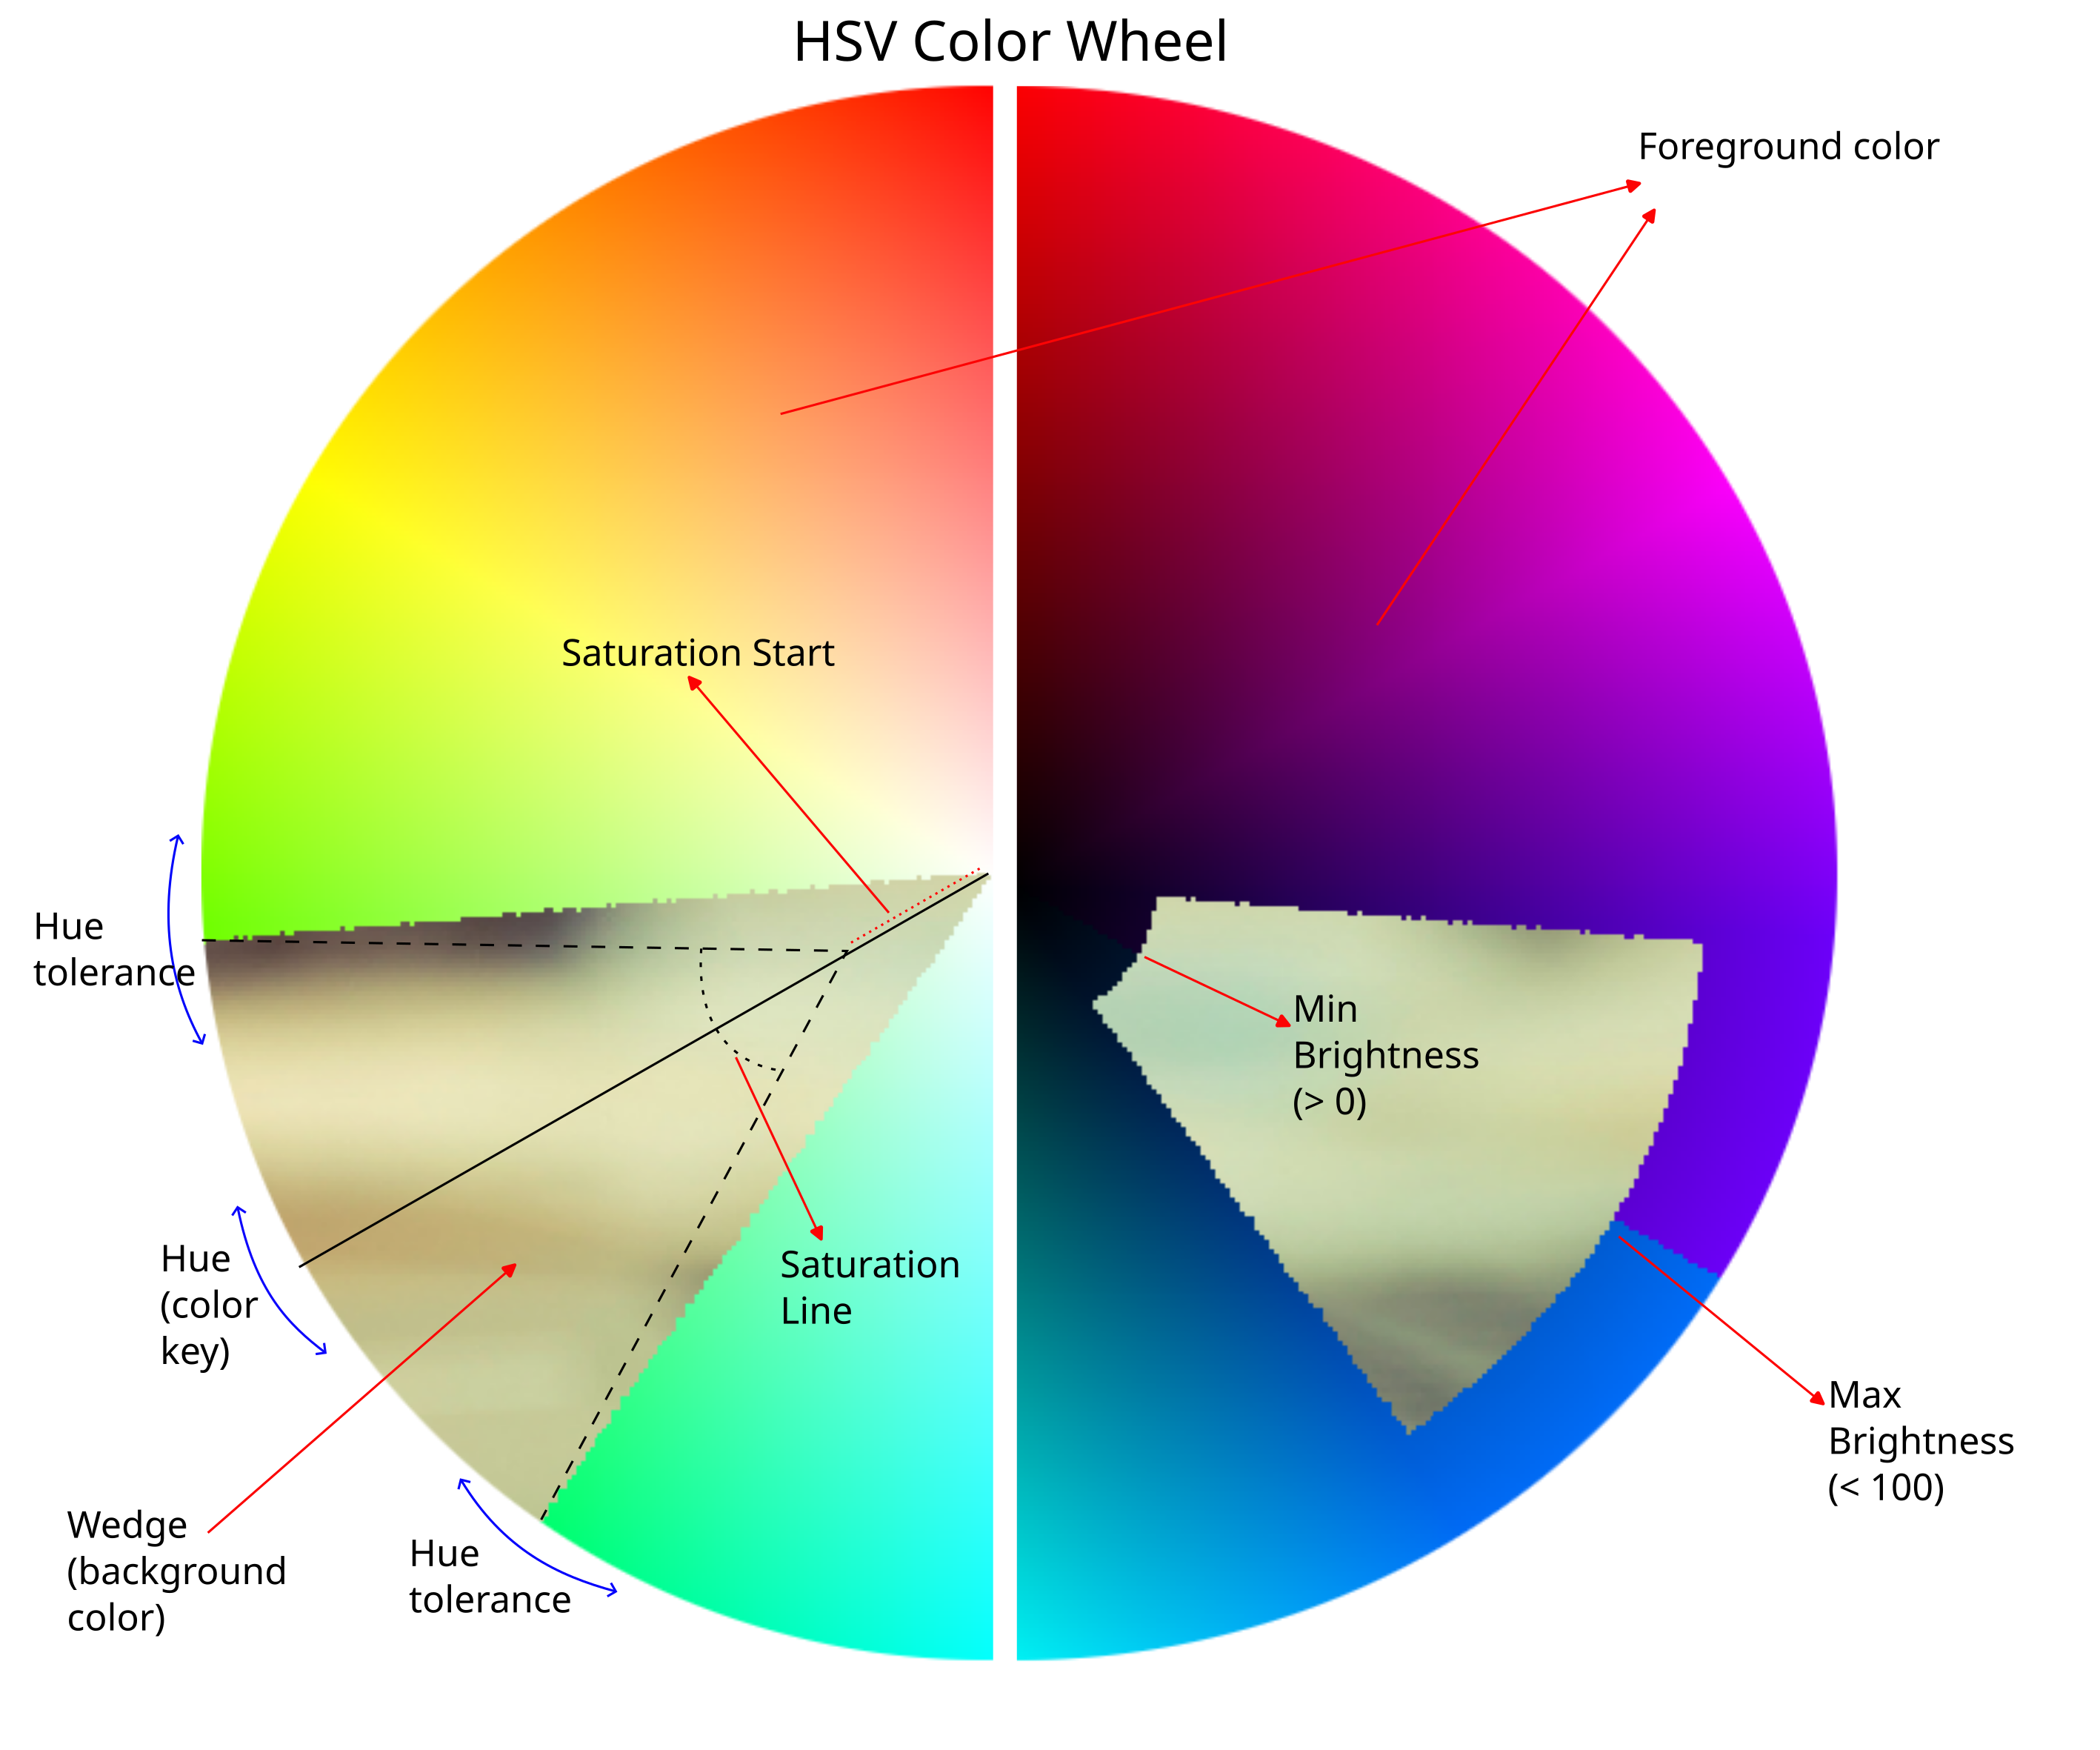
To understand how the plugin parameters work, we need to refer to the HSV color wheel (foreground color) in figure 10.31. You may want to first apply the Color Swatch plugin which is very helpful in determining which variables should be modified. Consider that this is an abstract example; in the real world we will be dealing with much more complicated masks.
Figure 10.31:
Various parameters in the 'Color' and 'Key Parameters' sections.
|
|
The left half has Saturation from 0 in the center to 100 on the edges. An example of a green screen is shown here. The right half has brightness from 0 (center) to 100 on the edges. The example of a blue screen is given here. The key color is the radius of the wheel, and its angle determines the hue. The Hue Tolerance is the arc of a circle (a wedge) that includes the radius. The wedge is the color range (mask) that we want to eliminate by keying, its shape is precise and easy to understand. The Brightness are the inner/outer extremes of the wedge; if the inner value (Min) is 0, then it coincides with the center point, if the outer value (max) is 100 then it coincides with the arc on the circumference. With intermediate values we will have masks similar to the one shown in the figure. Min Saturation is the distance from the center, along the Hue radius, from which we want to impose saturation with the value 0. It will be the value from which keying starts. Saturation Offset is an additional cut we make to the inner part of the wedge from the Min Saturation value. All of these adjustments allow us to establish a range of colors (Mask) that perfectly matches the background (the wedge in the example in the figure 10.31) that we want to eliminate. This is a precision operation, and it is not rare to return to the parameter combination several times to refine the mask.
Color section
In this section of the configuration window, you choose the key color and have the ability to see the mask created.
- Color...
- Select the key color (green, blue, or whatever) using the color wheel or the color picker. Only the Hue matters, not Saturation or Value. To use the color picker, click on the color picker icon in the Compositor window, then click on the color you want in the Compositor window. Finally in the Chromakey (Avid) parameters window, click on Use Color Picker. You will need to disable ChromaKey (Avid) plugin when using the Color Picker on the Compositor window.
- Show Mask
- The plugin does not create a true matte in the alpha channel, but creates a mask. Activating this option will show the foreground as a white (opaque) shape while the background in transparency. You will be able to control the extent of the mask, any jagged edges, small white areas within the mask or small transparency areas within the foreground, which are to be removed.
Key parameters section
In this section we expand the mask to a range of colors close to color key and refine the selection by also taking advantage of brightness and saturation.
- Hue Tolerance:
- Because there are slight variations in lighting in real cases, the background will not be in a uniform key color hue. Increase or decrease the Hue tolerance to mask out the background. In determining the hue range, it is useful to use the Color Swatch plugin in constant brightness mode and with Draw Source active, which allows us to see the pixels of the figure, making us choose which ones to let into the mask (keying out) and which ones not. If there are dark spots that are keyed out that shouldn’t be, it can be corrected later (With the Mask tool; this operation is called the Garbage Matte).
- Brightness:
- It allows the color range (Mask) to be better defined by exploiting the differences in brightness between background and foreground. This could be referred to as a Luma Key within the Chroma Key. Increase Min Brightness so that only the background is masked out, and not parts of the foreground. You can also reduce Max Brightness if some clear areas are keyed out (useful for very dark backgrounds).
- Saturation:
- Saturation allows the color range (Mask) to be better defined by exploiting the differences in saturation between background and foreground. Since the best results are obtained by keying pure colors, it may come in handy to eliminate the less saturated colors (proper to the foreground) while leaving the more saturated colors (proper to the background, i.e. Green/Blue Screen) to the keying action. Increase Saturation Start so that only the background is masked out, and not parts of the foreground. Saturation Line can be used to change this, because it acts similarly to Min Brightness. It could be said that Saturation Start concerns only the key color (wedge's vertex), while Saturation Line concerns the range of Hue tolerance. But it is best to start by leaving it at 0.
Check what it looks like at this stage, your mask should be pretty
clean. Toggle Show Mask to check what it looks like, it
should be OK. If not, repeat steps in the Key parameters section to get a better
key. The rest of the controls are useful to smear the mask to help
compositing later on. They will help you to make your key look much
cleaner.
Mask tweaking section
In this section you intervene on the already created mask with edge smoothing and transparencies.
- Slope:
- For now, the mask is a full on/full off mask that can be really harsh on the edges and not necessarily what you are looking for. In Slope and Out Slope will help you to smooth that key. In Slope acts on the inner side of the edges by grading them with keying (background) colors. It leaves more colors in the mask. Out Slope acts on the outer side of the edges by grading them with the foreground colors. It takes more colors out of the mask. Basically, the colors that are borderline in the mask will see their alpha channel reduced by half instead of being completely on or off.
- Alpha Offset:
- This control offsets the whole alpha channel by some amount, from -100=full opacity to +100=full transparency. Be sure to know what you are doing if you change it from the default value of 0.
Spill light control section
In this section we try to make halos, reflections and parasitic lights present on the foreground less noticeable via spill suppression.
- Spill saturation:
- Similar to Saturation Start, indicates the starting point from which spill suppression begins. It works if Saturation Start is > 0 because it acts only from that value, with the effect of retracting the starting point moving away from the Saturation Start value toward the center of the color wheel (white). This has the consequence of creating a small area beyond the edge of the wedge where spill suppression acts. Generally you set it with a small random value > 0 and then return to it after setting Spill Angle.
- Spill Angle:
- Spill Angle is the main parameter of spill suppression because it causes a very noticeable effect. Basically, it is an area that extends beyond the edge of the mask, increasing its angle and thus its size. In this area (which is a gradient) pixels of the reflections of the key color (green, for example) are mixed with pixels of the adjacent color (cyan on one side and yellow on the other, because we always refer to the HSV color wheel). The suppression effect replaces green pixels with adjacent ones, taking into account the gradient. This parameter, in addition to the spill saturation, softens the edges of the mask without resorting to desaturation to gray or white of the green pixels, which create a more visible detachment. It should not be overdone so as not to compromise the color balance of the entire figure.
- Desature Only:
- It takes the parameters of Spill Saturation and Spill Angle but instead of copying the neighboring colors over the green pixels, it applies a simple desaturation of the green pixels that become gray and then totally white. The effect is more noticeable and noisy because it creates a halo around the figure.
In the lower part we find various buttons:
- Store:
- Stores the complete current parameter set in memory.
- Recall:
- Sets all the parameters to the values, memorized previously by Store.
- Exchange:
- Swaps current values and Store'd values of the parameters.
- Undo:
- Restores all the parameters to the undo'ed values.
- Reset:
- Reset to default values.
All buttons work globally on the whole parameter set. Each time the ChromaKey dialog is opened, the Store values are cleared and reset to default. Therefore, if you press Recall having not pressed Store beforehand, it will do the same as Reset. Each time the dialog is closed, the Store values are forgotten (reset to defaults). As long as the dialog remains opened, Store values remain intact, even if the current timeline position changes. The operations on distinct parameters (turning sliders etc.) do not update the Undo values. The following operations update values for subsequent Undo: Global Recall, Exchange, Reset buttons (but not the buttons which reset individual parameters), opening the dialog, and moving current position in the timeline.
Now the mask is probably still very harsh, so just below the Chromakey (Avid) plugin, add a Blur effect, and select only the Alpha channel, with a radius of 2 or 3 (more if you really want to soften the edges). This will significantly help the keying.
Footnotes
- 9
- Credit for Plugin by Jerome Cornet; credit to original creator for major upgrade and credit to SGE for adaption and improvements. Avid is a trademark of Avid Technology, Inc.
The CINELERRA-GG Community, 2021
https://www.cinelerra-gg.org