Subsections
CriKey
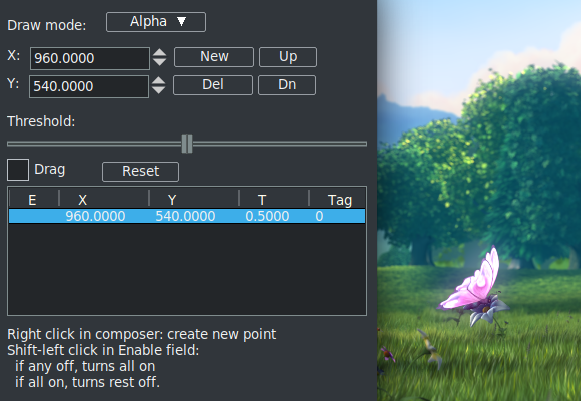
The Chroma Interpolation Key plugin, CriKey, is a regionally based chroma key with interpolation (figure 10.35). This is useful when you only want 1 or some specific zones to be defined by the chroma key as opposed to the entire image. Its most significant feature is that you can select several regions of interests and of different colors as opposed to only 1.
Figure 10.35:
three active point created in CriKey
|
|
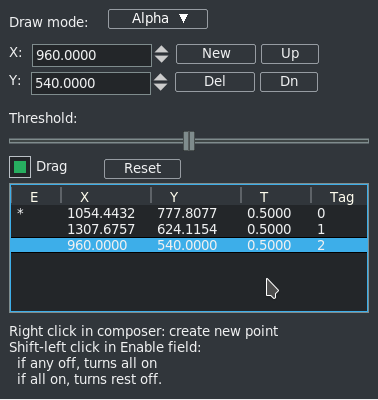
To start, if not already checked, turn on drag. In the composer window select an area of a certain color by clicking on that point with the right mouse button and check to see that it is enabled with an * in the "E" field. The color of the area is used to define the region of interest and then you can use the threshold slider to designate the tolerance variation. This creates a region that is the chroma key selection and a fill will be performed in that area, but only within that region. So, say for example, a red colored area was chosen, only the red color inside the region is selected – not that color red in the entire image. The drag capability makes it easy to check a point before right clicking it to see the effect. You will want to turn off drag when you are finished with CriKey so that it does not interfere with other compositor functions.
- Draw mode:
- options let you use Alpha for see-thru, Edge to just outline the edges of the region, or Mask to block. The pixels which match the selected color are replaced by black if Mask is chosen or see-thru/transparent if Alpha.
- X, Y:
- points coordinate.
- Buttons:
- New to create a new point, Up/Dn to move highlighted point up or down Del to delete the highlighted point.
- Threshold:
- slider goes from
0 to 1. Increasing the threshold, increases the area to be filled or masked. You can also use the mouse wheel to scroll the slider.
- Drag:
- for ease of use. If you need to clear the Drag enabled, you can easily do this with Allow keyframe spanning whose use is described in Allow Keyframe Spanning.
- Reset:
- button to revert to only the default middle point with all others being deleted.
- ListBox:
- "E" for Enabled with * marking that; "X" is the point’s x coordinate; "Y" is the point’s y coordinate; "T" is the threshold value of X, Y point; Tag represents the # of the selected
point.
- Hints:
- for usage shortcuts.
Some notable caveats
- When choosing an area that has variations of the same color within a region, for less work and for the best results, choose an average color in that region instead of an extreme end of that color.
- If the threshold is set appropriately you can see the edges which is helpful.
- The mask is computed and shows the fill region.
- Use the Gradient plugin to substitute a different color for the selected area.
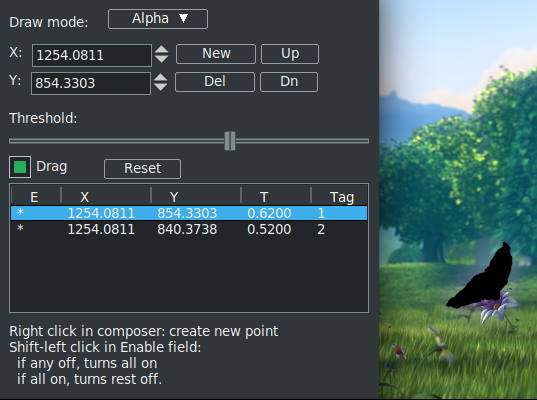
Figure 10.36 and figure 10.37 shows how moving the Threshold slider with the Point selected blacks out the single region which has the darker brown hills in it. Because the edge was located, any of the same color in the rest of the video would not be blacked out.
Figure 10.36:
The screenshot shows the compositor with some default settings in the controls window.
|
|
Figure 10.37:
same screenshot with moving Threshold
|
|
Usage steps
- Click Reset (there will be a single X, Y coordinate point that is in the middle and not enabled)
- Check to make sure Drag is on.
- In the Compositor, right click on area of interest and an X, Y coordinate will appear in the listbox.
- Click on the E Enabled field next to this latest point and an * asterisk will show.
- Now you will see an area turn black so use the Threshold slider to only black out the area of interest.
- Repeat steps 3 - 5 until you have selected all of the desired areas.
- Finally, turn off drag so as not to interfere with other compositor functions
The CINELERRA-GG Community, 2021
https://www.cinelerra-gg.org