Next: Copy/Paste Effects Up: Plugins Previous: How to Use Plugins Contents Index
Many operations exist for manipulating effects once they are on the timeline. Because mixing effects and media is quite complex, the methods used in editing effects are not as concise as cutting and pasting. Some of the editing happens by dragging in/out points, some of the editing happens through popup menus, and some of it happens by dragging effects.
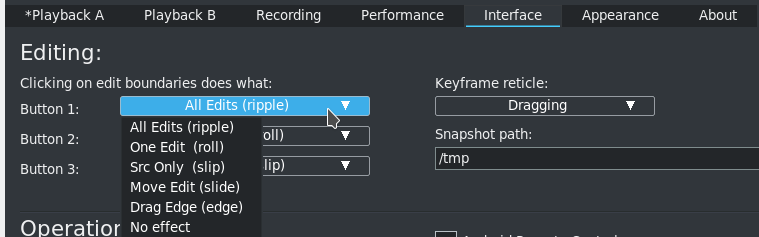
When enabled, which is the default, and you edit tracks, the effects follow the editing decisions. If you cut from a track, the effect shrinks. If you drag edit in/out points, the effect changes length. This behavior can be disabled by selecting Settings → Preferences → Interface tab → Editing section, see figure 10.4 .
To edit effects, you can move the timeline cursor over the effect borders until it changes to a resize left or resize right icon. In this state, if you drag the end of the effect, it performs an edit just like dragging an edit edge. The five editing behaviors of track trimming apply to effect trimming and they are bound to the mouse buttons that you set in interface preferences as shown in the previous screencast. Trimming simply means changes the duration dragging the edges.
When you perform a trim edit on an effect, the effect boundary is moved by dragging it. Unlike track editing, the effect has no source length. You can extend the end of an effect as much as you want. Also unlike track editing, the starting position of the drag operation does not bind the edit decision to media. The media the effect is bound to does not follow effect edits. Other effects, however, do follow editing decisions made on an effect. You can disable effects from being subject to the edit decisions by using the pulldown Settings and toggling off Edit effects. If you drag the end of an effect which is lined up to effects on other tracks, the effects on the other tracks will be edited while the media stays the same. When you drag an effect in from the Resources window you can insert the effect in the portion of the row unoccupied by the trimming operation. In some cases you will want a trimming operation to change only one row of effects. This can be achieved by first positioning the insertion point on the start or end of the effect. Then press the shift key while beginning the trimming operation. This causes the operation to change only one row of effects.
You can move effects up or down. Every track can have a stack of effects under it. By moving an effect up or down you change the order in which effects are processed in the stack. Go to an effect and right click to bring up the effect menu. The Move up and Move down options move the effect up or down. When you are moving effects up or down, be aware that if they are shared as shared effects, any references will be pointing to a different effect after the move operation.
Finally, there is dragging of effects . Dragging effects works just like dragging edits. You must select the arrow in the main window transport buttons line to enter drag and drop mode before dragging effects. Dragging a plugin causes a highlight outline to be drawn over a targetable timeline region, and the plugin can be re-positioned into any plugin track. The effects snap to media boundaries, effect boundaries, and tracks. If you drag a reference to a shared effect, the reference may point to the wrong effect afterwards. It is recommended that you re-construct shared effect track references.
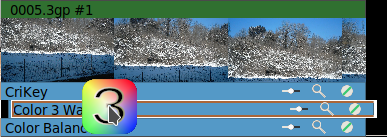
Figure 10.5 showing 3 plugins, two still plugin, two have already been dragged and the Color 3 Way in the process of being dragged. Note the gold-colored frame which enables allow drag and drop editing mode.
The CINELERRA-GG Community, 2021