Subsections
Nested Clips
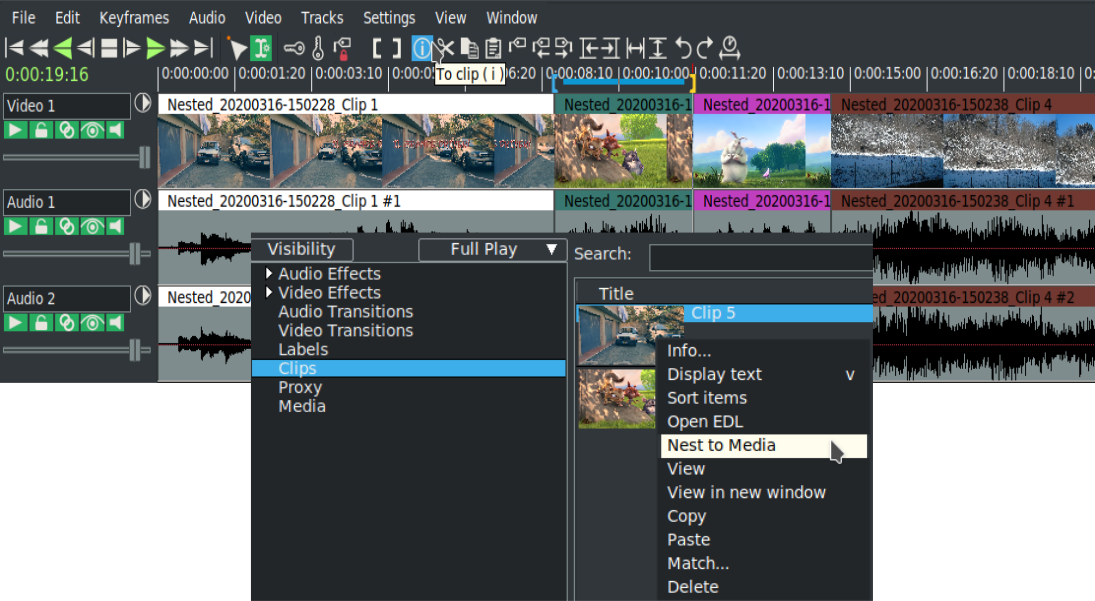
It is also possible to create
clips and convert them to nested edl. This is
done by first creating a clip using the standard cut, clipboard,
paste, and/or edit panel buttons. Now, using the resources
clip folder, select a clip to be nested, and use the right
mouse button to select a clip. This activates the clip popup menu.
Select the Nest to media menu item, and the clip will be
converted to a Nested: Clip and put in Media
folder. Conversely, you can select a Nested: Clip, use the
EDL to clip menu item, and the clip will be reverted to a
Clip. This works similarly to the group / un-group editing
features of many graphic design editing programs, but in this case
the groups are rendered compositions (figure 6.7).
Nested clips can be proxied and when they are, the resulting files
are placed in the user's $HOME/Videos directory by default. This
can be modified by changing
Settings
→ Preferences
→ Interface
tab, Nested Proxy Path.
Figure 6.7:
Nested clips in Timeline and Resources window
|
|
creating nested clips is a complicated internal process for CINELERRA-GG, especially for managing audio tracks. Therefore you need to make sure you have your project set up as you expect before you start nesting with the Nest to Media command. Below are several things to remember.
- The creation of the nested clip is based on the settings in Settings
→ Format. Be sure that the number of audio tracks and channels is the same as we want to have in the nested clip. In addition, it is better to make each audio track independent from the others (which could be linked in more than one channel) using the option: Audio
→ Map 1:1
- You can do any editing on the nested clip once it is loaded to the timeline. For example we can start an OpenEDL session to make the changes. Once out of the OpenEDL session it may be that the changes made are not visible in the original nested clip. You can fix this by doing RMB on the nested clip in the Resources/Media window and choosing Rebuild index. This process may take some time depending on the size of
the media; because of the additional time required to do this, it is not done automatically in order to allow the user to make the decision as to when they are done editing enough and need to see the exact results
in order to save time.
- Because of the way the timeline thumbnails are displayed, after editing using OpenEDL of a
nested clip, the thumbnails of the video track may be redrawn and may look different and out of sync with the
way they did originally with respect to the audio waveforms. This is simply a result of the redrawing of the
video track which is independent from the redrawing of the audio tracks. The playback is still synchronized.
- Example 1:
- You want to make a flashback/rewind at the end
of your video that represents a quick summary of the entire video in
black and white. On he timeline, you have 60 seconds of edits with
clips, cuts, zoom in, zoom out and any other edits. Now you want to
get this 60 seconds compressed to 10 seconds, play in
reverse, and in black and white at the end of your video. You would
copy the 60 seconds in a clip, nest the clip in the Clip folder of
the Resources window and drag it to the timeline. You will see only
a clean clip without all of the edits that were used to create it
because nesting display a clip without having to actually use the
Render menu. Now you can add a Reverse effect, Color3way plugin for
black and white, and use the Speed auto to get the 60 seconds down
to only 10 seconds.
- Example 2:
- You are working on a complex project with a
team in a separate location. You create some sub projects, i.e. sequences, that you or the team will use in the Master project to
merge the sequences in the right order and to make the final color
correction steps.
In each of the examples you can see the benefit of nesting to create
clean looking timelines because of the automatic rendering
capability of nesting.
The CINELERRA-GG Community, 2021
https://www.cinelerra-gg.org