The Patchbay
On the left of the timeline is a region known as the patchbay. The
patchbay enables features specific to each track as described next.
- Textbox
- for naming the track. The default names will usually
be Video #, Audio #, or Mixer # if using the multi-camera/mixer
operations. A # will be designated for subsequent tracks as in 1,
2, 3 and so on.
- Expander
- which is a down arrow on the right side, is for
viewing more options on the patchbay and for viewing the effects
represented on the track. You can just click on the expander to
expand or collapse the patchbay and the track. If it is pointing
sideways, the track is collapsed. If it is pointing down, the track
is expanded. Existing effects appear below the media for the track.
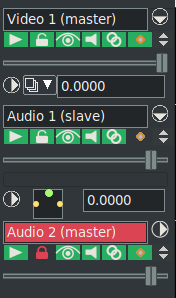
Below the textbox name are several toggles referred to as
attributes for different features (currently there are 7 as
shown in figure 5.2). If the toggle button is
shadowed by a color, the feature is enabled. If the toggle is the
background color of most of the window, it is disabled. Click on the
toggle to enable/disable the feature.
Several mouse operations speed up the configuration of several
tracks at a time. Click on an attribute and drag the cursor across
adjacent tracks to copy the same attribute to those tracks. Hold
down Shift while clicking a track's attribute to enable the
attribute in the current track and toggle the attribute in all the
other tracks. Or you can:
- hold down Shift while clicking an attribute,
- click until all the tracks except the selected one are
disabled,
- then drag the cursor over the adjacent track to enable the
attribute in the adjacent track.
The 7 attributes are described here next followed by the other available feature icons and their description.
- Play Track
- determines whether the track is rendered or
not. If it is off, the track is not rendered. For example if you
turn it off in all the video tracks, the rendered media file will
have only audio tracks. If the track is chained to any other tracks
by a shared track effect, the other tracks perform all the effects
in this shared track, regardless of play status of the shared track
that in this particular case affects the media output but not fade
and effects.
- Arm Track
- determines whether the track is armed or not.
Only the armed tracks are affected by editing operations. Make sure
you have enough armed destination tracks when you paste or splice
material or some tracks in the material will get left out. In
addition to restricting editing operations, the armed tracks in
combination with the active region determine where material is
inserted when loading files. If the files are loaded with one of
the insertion strategies which do not delete the existing project,
the armed tracks will be used as destination tracks. Note that disarming
a track does not prevent you from dragging or attaching an Effect/Plugin
onto a disarmed track - this is not considered an edit in this case.
- Draw Media
- determines if picons or waveforms are drawn on
the asset in the track. You may want to disable this if you know
that the media/format takes a long time to draw on the timeline. By
default it is set to on in order to see picons on the timeline.
- Don’t send to output
- – more commonly called
mute – causes the output to be thrown away once the track is
completely rendered. This happens whether or not Play track
is on. For example if you mute all the video tracks, the rendered
media file will have a blank video track. Mute track is represented
on the timeline with a line that has the default color of a
pinkish-orange. Use the pulldown View
→ Mute to
have the line displayed. It is a keyframable attribute, but Mute
track keyframing is a toggle and it has only the two values of on or
off. If a track is part of a shared track effect, the output of the
track with the shared track effect is overlaid on the final output
even though it is routed back to another track (the shared track).
Mute track is used to keep the track with the shared track effect
from overlapping the output of the source track (the shared track)
where the shared track effect is not present.
- Gang Fader
- cause the fader to track the movement of
whatever other fader you are adjusting by dragging either the fader
or the curve on the track. It doesn't affect the editing made with
menu controls. A fader is only ganged if the arm track is also on.
This is often used to adjust audio levels on all the tracks
simultaneously. Gang also causes Nudge parameters to synchronize
across all the ganged tracks.
- Master Track
- Mark a track as master serves when using Gang Channels or Gang Media mode. See Displaying tracks: Ganged mode
- Track Data Height
- this up/down toggle symbol to the immediate right
of the 5 attributes, is used to individually resize each track. This makes
it very easy to temporarily expand or contract the size of that track either
by clickin with the left mouse button or using the middle wheel up/down.
- Fader slider
- fade values are represented on the timeline
with a pink (default color) curve that is keyframable. All tracks have a fader, but
the units of each fader depend on whether it is audio or video.
Audio fade values are in dB. They represent relative levels, where 0
is the unaltered original sound level, -40 is silence, -80 the
minimum value set by default. You can move fader and keyframes down
to -80 but the parameter's curve won't go below -40. For your
convenience you can set a different fade range with the curve zoom.
Audio fader’s main purpose is to fade out sound or to lower
the sound level smoothly to silence, or fade in to make
sounds appear gradually instead of suddenly. Video fade values are
the percentage of opacity of the image in normal overlay mode, the
percentage of the layer that is mixed into the render pipeline in
the other overlay modes. Click and drag the fader to fade the track
in and out. If it is ganged to other tracks of the same media type,
with the arm option enabled, the other faders should follow. Hold
down the Shift key and drag a fader to center it on the original
source value (0 for audio, 100 for video).
- Mixer
- in the expanded patchbay for that track designates
the multi-camera mixer mode.
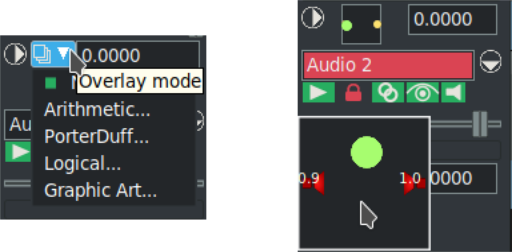
- Overlay mode
- in the expanded patchbay is used for
porter-duff operations and is full explained in
Overlays chapter.
- Nudge
- is in the expanded patchbay. The nudge value is
the amount the track is shifted left or right during playback. The
track is not displayed shifted on the timeline, but it is shifted
when it is played back. This is useful for synchronizing audio with
video, creating fake stereo, or compensating for an effect which
shifts time, all without altering any edits
(figure 5.3).
Figure 5.3:
Video Overlay, audio Pan and Nudge.
|
|
Enter the amount of time to shift to instantly shift the
track. Negative numbers make the track play later. Positive numbers
make the track play sooner. The nudge units are either seconds or
the native units for the track (frames or samples). Select the units
by right clicking on the nudge textbox and using the context
sensitive menu. Nudge settings are ganged with the Gang faders
toggle and the Arm track toggle. Use the mouse wheel over the nudge
textbox to increment and decrement the value.
- Pan
- is available in the expanded patchbay for audio
tracks via a panning box. Position the pointer in the panning box
and click/drag to reposition the audio output among the speaker
arrangement. The loudness of each speaker is printed on the relative
icon during the dragging operation. The panning box uses a special
algorithm to try to allow audio to be focused through one speaker or
branched between the nearest speakers when more than 2 speakers are
used.
Press the Tab key while the cursor is anywhere over a track to
toggle the track arming status. Press Shift-Tab while the cursor is
over a track to toggle the arming status of every other track.
Automatic audio mappings
Several convenience functions
are provided for automatically setting the panning to several common
standards. They are listed in the Audio menu. These functions only
affect armed audio tracks. They are:
- Audio
→ Map 1:1
- This maps every track to
its own channel and wraps around when all the channels are
allocated. It is most useful for making 2 tracks with 2 channels map
to stereo and for making 6 tracks with 6 channels map to a 6 channel
sound card.
- Audio
→ Map 5.1:2
- This maps 6 tracks to 2
channels. The project should have 2 channels when using this
function. Go to Settings
→ Format to set the
output channels to 2. This is most useful for down-mixing 5.1 audio
to stereo (for more information refer to Configuration, Settings and
Preferences section 16.2.1).
Although CINELERRA-GG lets you map any
audio track to any speaker, there are standard mappings you should
use to ensure the media can be played back elsewhere. Also, most
audio encoders require the audio tracks to be mapped to standard
speaker numbers or they will not work.
In the channel position widget, the channels are numbered to
correspond to the output tracks they are rendered to. For stereo,
the source of channel 1 needs to be the left track and the source of
channel 2 needs to be the right track. For 5.1 surround sound, the
sources of the 6 channels need to be in the order of center, front
left, front right, back left, back right, low frequency effects. If
the right tracks are not mapped to the right speakers, most audio
encoders will not encode the right information if they encode
anything at all. The low frequency effects track specifically can
not store high frequencies in most cases.
Subsections
The CINELERRA-GG Community, 2021
https://www.cinelerra-gg.org