Single File Rendering

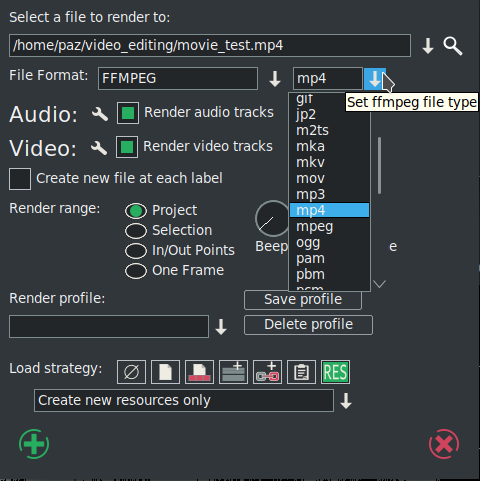
Use the File pulldown and select Render to start the render dialog (figure 7.1). Then choose the desired parameters.

Figure 7.1: Example of the Render menu
Image render

Select a file to render to:
enter the path and filename to write the rendered file to in the textbox below.
File Format:
use the down arrow to see file format options. For ffmpeg, which has its own set of options, you will then have to select an ffmpeg file type from the down arrow choices. The format of the file determines whether you can render audio or video or both.
Render audio tracks:
check this toggle to generate audio tracks
Render video tracks:
check this toggle to generate video tracks. The Render window will sometimes automatically update the Render Audio Tracks or Render Video Tracks checkbox as allowed by the chosen file format, but you should always check (figure 7.2). For example, if the PNG file format is selected, only the Render Video Tracks will be checked. Or if an ffmpeg format is chosen and the file format does not render audio, the Render Audio Tracks will be unchecked. The invalid choices will be ghosted out.

Figure 7.2: Audio and Video tracks automatically checked for Pro file type
Image render01

Wrench:
select the wrench next to each toggle to set compression parameters. If the file format can not store audio or video the compression parameters will be blank. If Render audio tracks or Render video tracks is selected and the file format does not support it, trying to render will result in an error message. More details in the section: Extra “cin_” Options for Render with FFmpeg
Create new file at each label
the option causes a new file to be created when every label in the timeline is encountered – a separate file for each. This is useful for dividing long audio recordings into individual tracks. When using the Render Farm (described later), Create new file at each label causes one render farm job to be created at every label instead of using the internal load balancing algorithm to space jobs. If the filename given in the render dialog has a 2 digit number in it, the 2 digit number is overwritten with a different incremental number for every output file. If no 2 digit number is given, CINELERRA-GG automatically concatenates a number to the end of the given filename for every output file. For example, in the filename /movies/track01.wav the 01 would be overwritten for every output file. The filename /movies/track.wav; however, eventually would become /movies/track.wav001 and so on. Filename regeneration is only used when either render farm mode is active or creating new files for every label is active.
Render range:
choices are Project , Selection, In/Out points, and One Frame for single images like Tiff. For these images, Render range will have One Frame automatically checked and all of the others ghosted since nothing else makes sense (figure 7.3). This makes it easy to set the insertion point where you want the 1 frame to be rendered rather than having to precisely zoom in to set the in/out pointers. Note that whichever Render range is checked, remains checked so that if One Frame gets automatically checked, the next time you render it will still be checked and you will have to select a different one if desired. That is why you should always check the settings.

Figure 7.3: Render menu displaying a PNG one frame option
Image render02

Beep on done:
as a convenience when a render is complete, check this box. It gives you the chance to work on something else while waiting and still be immediately notified when the render is complete.
Render Profile:
another convenience feature to take advantage of if you use specific render formats frequently, is to save that profile for future usage without having to set it up again.
Save Profile:
after setting up your render preference formats, do not forget to type in a format name and then use the save profile button to save it. The named/saved Profiles will be saved in your $HOME/.bcast5/Cinelerra_rc file where it can be carefully modified.
Delete Profile:
if you want to delete a saved profile, highlight the one you no longer want and delete.
Insertion strategy:
select an insertion mode from the available choices as seen when you click on the down arrow on the right hand side of the option. The insertion modes are the same as with loading files. In the case if you select “insert nothing” the file will be written out to disk without changing the current project. For other insertion strategies be sure to prepare the timeline to have the output inserted at the right position before the rendering operation is finished.

Even if you only have audio or only have video rendered, a paste insertion strategy will behave like a normal paste operation, erasing any selected region of the timeline and pasting just the data that was rendered. If you render only audio and have some video tracks armed, the video tracks will get truncated while the audio output is pasted into the audio tracks.


Subsections
The CINELERRA-GG Community, 2021
https://www.cinelerra-gg.org