Next: Speed PerCent Up: Video Effects Previous: Shift Interlace Contents Index
Now you can sketch lines, curves or shapes, on your video in different colors using various pen widths and pen type with the sketcher plugin. You can even fill them. You can do rotations and scaling and apply two anti-aliasing modes; single and double. Getting started is fairly easy – simply hold down the shift key while using the left mouse button to create a bunch of points in the compositor window. However, to do more than that you will need to understand the buttons and options or you may end up with unexpected results.
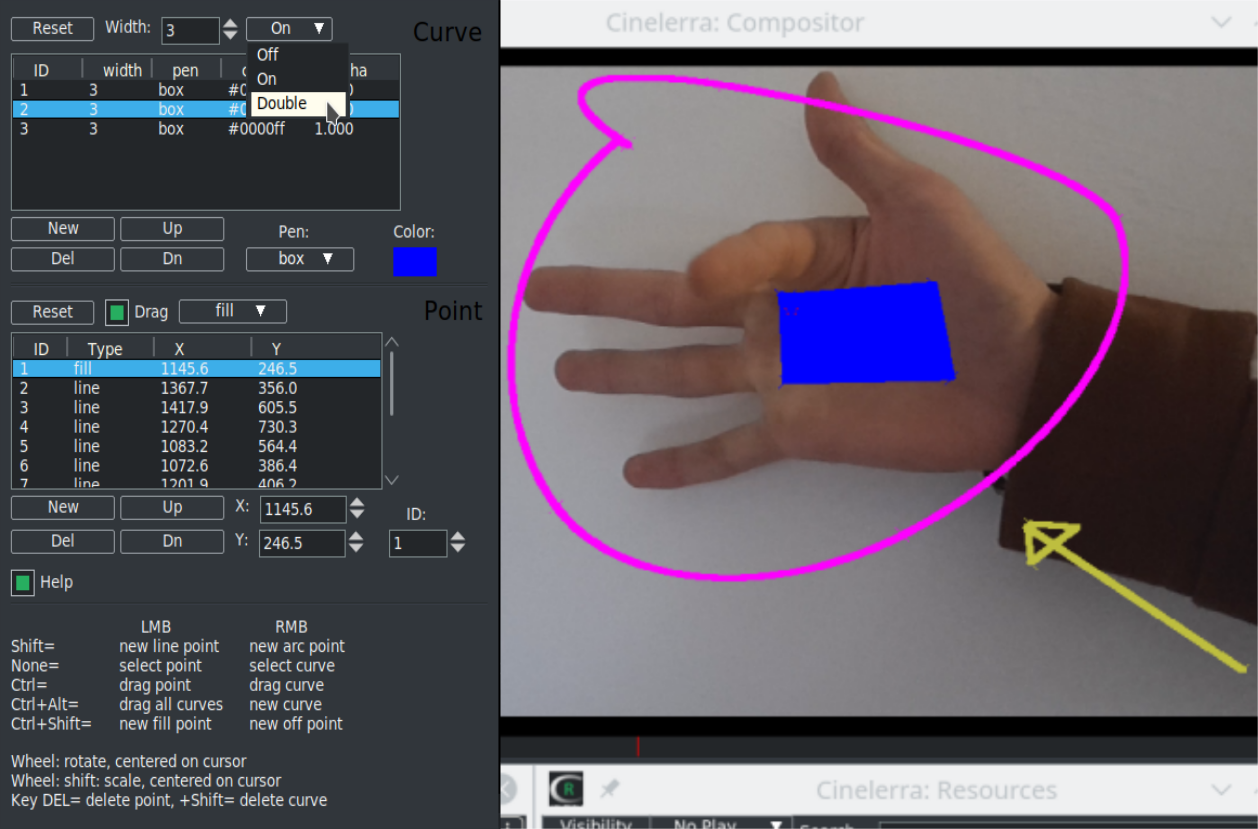
(figure 10.66) shows the Sketcher gui and the sketch lines/curves created in the Compositor.
In the screencast, note the Sketcher window gui Curve top section and the Point bottom section. The pink circle sketch is id #1 in the curve section. Since id #2 is highlighted in the Curve section, the X/Y coordinates in the Point section below show the points used to create the blue shape. Point 6 is selected so we see a red crosshair (Drag point) inside the rectangle. The yellow arrow on the image is id #3 curve. Finally the cursor shows Double anti-aliasing.
Uncheck Drag before rendering; if you do not uncheck, the drag points will show in your output. Drag must be checked on to edit the data. Drag must be checked off to use Click to play. If the drag button flickers when clicked then another window has drag focus. Un-focus it first. Turn drag off to see what the sketcher figure will look like when rendered.
Curves can be any number of points or just a single point. You must create a new curve if you want a new string of points not connected to the current curve. Highlight the curve id # for a specific curve to modify its values. Left mouse click or right mouse click on an existing point on the highlighted line/curve id # will automatically highlight the selected point in the Point section of the gui and turn red in the image. We can drag this point to the desired position using CTRL + LMB; or we can translate the entire selected curve using CTRL + RMB.
With the mouse wheel we can rotate our curves; the center of rotation is given by the position of the cursor. Normally the scroll is slow to be more precise. If you make a fast scroll you have an acceleration that allows you to make complete rotations in a short time. Using the mouse wheel with the SHIFT key we can instead scale the size of the curve; the fixed scaling point is still given by the mouse position.
There will always be 1 empty curve automatically defined when you start or even reset. You can not delete the empty default curve but you can use it for a curve.
LMB click almost anywhere on the compositor screen will automatically show, in the currently highlighted curve, the closest point by turning it red.
There is no undo recorded between gui updates. It is recommended that you use the option "b" to save a backup if you get to a place where you want to make sure you do not lose your sketch.
Points and curves are identified by numeric ids, and not the table position. This is so that deleting and inserting points/curves does not shift the interpretation of which points are associated for interpolation. For purposes of this discussion, prev refers to previous. The prev keyframe constitutes the draw list of curves and points. The prev ids are used to access the next keyframe interpolation input data. When next exists for prev.id the interpolation functions apply. When next does not exist, prev is returned for the interpolation value. The keyframes may be any id sequence; both the prev and next keyframe id sequences are arbitrary non-unique sets. This means that if an id is specified redundantly, it causes a redundant draw when it is the prev keyframe, and only the last item with the id in the next keyframe is used for interpolation.
The fill point is a marker point, and not really part of the curve. That point identifies the inside of the loop. It can also be used to identify the outside of the loop in order to fill that. The loop is created by drawing a line from the last point to the first point in the curve. The line of this last segment is from the last point of the curve. If there are isolated loops in the curve (it is self intersecting) then you will be able to use multiple fill points to fill these regions.
The CINELERRA-GG Community, 2021