Next: Bump autos Up: Keyframes Previous: Using Autos Contents Index
Speed automation resamples the data at a higher or lower playback rate. Speed automation can operate on all tracks of the same type, either video or audio, with a single click; or all tracks, both video and audio, with a double click. The curves to be affected must be both armed and ganged in the track patchbays to be included in the operation. You can see the advantage of having different media types ganged the same so that they will remain synchronized. However, if as recommended you have Settings of Align cursor on frames set, video will always snap to a frame, whereas audio does not. Because the smallest pieces are audio and not video, when video is present in order to maintain synchronization be sure to do the double click on the video track. The single/double click feature also works in the same manner for Fade Automation.
The conversion algorithms that calculate the duration are approximate, not exact. Speed is not checked when inserting media on a track that already has speed adjustments so duration will not be corrected in that case. You can not do negative time and you can not play backwards. When working with edits and the speed auto, if you make a cut in a section, the speed curve values should not change over the remaining playable edits. It is possible to easily add disjoint curve points at the boundaries of the edit to preserve the curve shape.
Steps to demonstrate Auto Gang of Speed/Fade on all of the audio and video tracks are listed below:
Releasing button 1 (LMB) ends the current dragging operation, but single clicking on a speed/fade keyframe handle again will restart the drag operation on tracks of the same type. Double clicking will select all armed tracks which have handles in the exact same cursor position. It is sometimes difficult to get the desired value for the speed and it may take a few tries to get to the desired endpoint, but you can use an auto slider bar to get better control for more precision. This is not ganged so you will have to do this on each track to achieve the same value.
An easy way to get an exact position is to set the Automation range in the bottom bar of the main window to the low and high ends of the desired range. For example, 1.000 to 50.000, which makes it so you can drag the speed/fade handle all the way to the left for 1.000 or all the way to the right for 50.
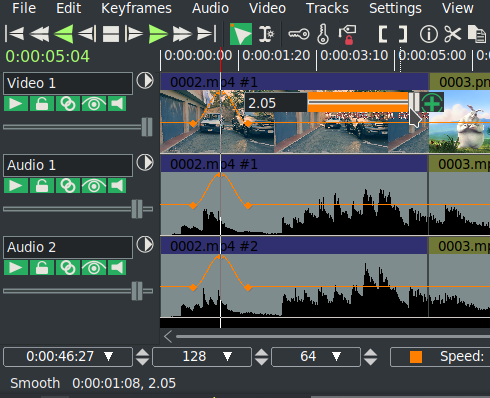
Figure 8.5 shows orange keyframes and lines for the ganged speed automation on all video/audio tracks. The figure shows the orange speed slider bar triangle with the current value displayed via the tooltip. Note the status bar numbers in the lower lefthand corner displaying 01:08 seconds as the location and 2.05 as the playback rate.
One other helpful item is a small colored indicator in the zoombar Automation Type box when you have clicked on an auto line. It will be the same color as that line so you can easily see out of the corner of your eye what that line refers to. This is especially useful for the Camera and Projector X,Y,Z lines which are often right on top of each other. In addition the status bar will have the colored indicator to the left of the last auto value when that status is visible.
The CINELERRA-GG Community, 2021