Next: Speed / Fade Automation Usage and Up: Keyframes Previous: Automation Keyframes / Autos Contents Index
The first click on the curve, creates a keyframe which you can click drag on to reposition. The second click at a later position, generates the smoothing by creating a smooth ramp. Ctrl-dragging on a keyframe round control point handle changes the value of either the input control or the output control. This affects the sharpness of the curve. While the input control and the output control can be moved horizontally as well as vertically, the horizontal movement is only for legibility and is not used in the curve value. When you Shift-drag on a timeline curve, the keyframe snaps to the value of either the next or previous keyframe, depending on which exists. It will snap up or down depending on direction of movement. This lets you set a constant curve value without having to copy the next or previous keyframe.
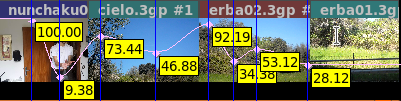
To make it easier to navigate curve keyframes, since there is not much room on the timeline for a wide range of curve values, you need to zoom the curves in and out vertically to have any variability. This is done by 2 tools: the automation fit button, Alt-f, and automation zoom menu which is seen at the bottom of the main window (figure 8.1). The automation fit button scales and offsets the vertical range so the selected curve area appears in the timeline. If a region of the timeline is highlighted by the cursor, only that region is scaled. In/out points do not affect the zoomed region. The automation zoom menu manually changes the vertical scaling of the curves in multiples of 2. Click on its tumbler to change the zoom. Alt- ↑ and Alt - ↓ change the automation zoom from the keyboard.
Other mouse actions have the following effects:
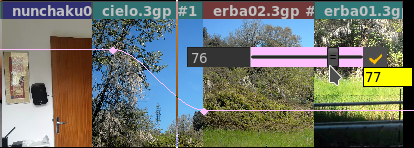
You can click mouse button 3 (RMB) on a keyframe box and a menu pops up with the first menu item showing the keyframe type. The top menu item can be activated for immediate access to update the automation keyframe value. Some keyframe types, which have values that can be manipulated in another way than by dragging the color coded line, now show up with a different colored background to make them more visible. Keep in mind that Zoombar ranges/values must be set to appropriate values when working with specific keyframe types, such as Fade or Speed. If you do not see the auto line in the visible area of the video track, try the key combination Alt-f or select the speed in the Automation Type drop-down menu at the bottom of the main window. To the right of this field is Automation Range where you can set the display ratio of these lines. Simply change the values until the lines are visible again.
Figure 2.39 and figure 8.2 shows several color coded lines for different keyframes and specifically the slider bar for the Fade keyframe. It is in the same color as the color coded keyframe type line which is the same color which would be shown in the Show overlays window figure 2.38.
In the Editing section of Settings → Preferences, Interface tab there is Keyframe reticle with options of Never, Dragging, or Always. This is used to help in checking edit alignment across tracks. (A reticle is a sighting line used to line up visual items, like cross hairs in a eyepiece.) The appearance and function of sighting lines can be changed when dragging auto keyframes. To see the effect, create some fader autos and drag a few to see the reticles drawn — you will see something similar to the next screencast (figure 8.3). Always renders a line over all plugins, and dragging only over the drag icon. Never draws nothing. The default is dragging.
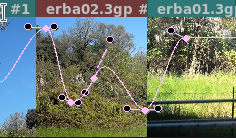
Control points allow for setting the slope of auto curves and then subsequently adjusting that slope (figure 8.4) . To modify a current keyframe you just right mouse it and change to either Tangent or Disjoint edit. In the screencast to the right, the Fade Auto has pink colored curves and control points are seen as dashed lines next to the keyframe box with black filled circles on each end of the line. Use the Ctrl key with the left mouse button to modify the control point lines.
See D.3 for a pratical example.