Subsections
Title
The Titler allows you to add text from within CINELERRA-GG. It has many configuration capabilities. Often it is convenient to apply the plugin on a separate track (shared or not), in order to make it independent from the video track and have more freedom in editing and configuration. For example, you can apply the Rotation plugin to rotate the title without rotating the underlying video. Another thing to keep in mind when using the Titler plugin is that it works on the temporary and therefore it is not affected by Camera movements (curves), but only by Projector movements.
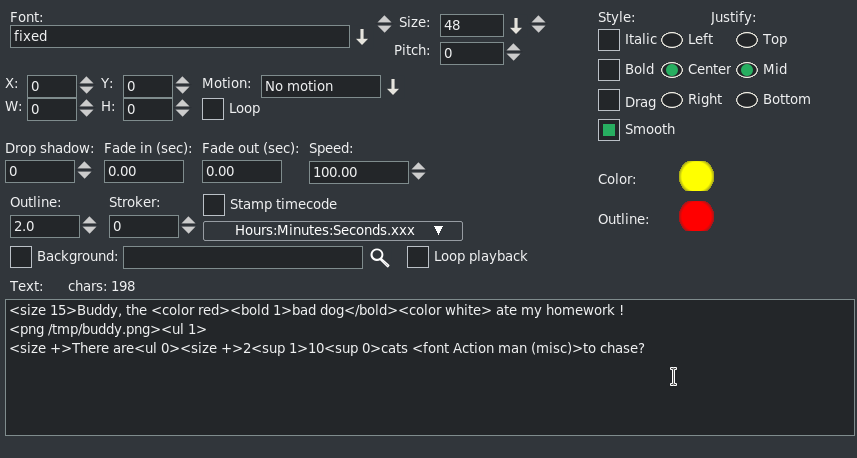
The titler has standard options for font, size, and style plus many options as described next (figure 10.67)
Figure 10.67:
GUI of the Title plugin
|
|
- Justify
- justifies the text relative to the entire frame. Once justified, the X and
Y offset is applied. This allows text to be justified while at the same time letting you push it within the title safe region.
- Motion type
- scrolls the text in any of the four directions. When using this, the text may disappear. Make sure the speed is set to a reasonably high value (for example 150) and move the insertion point along the timeline until the text is far enough along the animation to reappear. The text scrolls on and scrolls off. Setting loop causes the text to scroll completely off and repeat. Without loop the text scrolls off and never reappears. The speed of the animation is determined by speed in pixels per second. Set it higher to speed up the animation.
- Smooth
- with Chroma Key, a shadow may show; remove by enabling this to add/remove the shadow.
- Drop shadow
- draws a black copy of the text to the bottom right of the original text. This is useful when drawing text over changing video to keep the border always visible.
- Fade in/Fade out
- are a second type of animation. If the fade seconds are 0, no fading is done.
- Color and Outline
- allows you to pick the color for using to draw the text or its outline.
- Stamp timecode
- replaces text with the current position on the timeline in seconds, frames or samples.
To create special effects for your title you can place it on a dedicated track and insert other realtime video effects just under the title effect and/or use camera and projector. With keyframing you can animate your title and make it change position, size, color, transparency, texture, or shape over time.
For improving playback performances of titles with effects, you can reduce the size of the dedicated track. Right click on the track and select Resize track... Enter the smallest resolution that still keeps the title visible.
To include graphical elements like logos, you may want to import your title as a PNG image (alpha channel transparency is possible), move it with camera and projector or add effects.
Some recently added options
- Drag
- initial default checkbox is off so that the Title plugin will work as it always has. With Drag active, we can create a box that works as a region to the title; we can resize and translate it as we wish, and we can add a background image (or video) to it. See later how to use the background image.
- Anchors
- When you turn on the Drag feature, nine different anchors/handles will appear on compositor window. The middle anchor allows you to drag your title wherever you want in the compositor window (X, Y coordinates). The other 8 handles, drawn as arrows in each corner and in the middle of each side, let you change the size of the drag area box so that your title is within that area if it fits and as it is directed. If you need to clear the Drag enabled, you can easily do this with Allow keyframe spanning whose use is described in Allow Keyframe Spanning. Another way to reset the box to default, i.e. the entire frame, is to set X and Y to 0 and W and H to the frame resolution (e.g. 1920x1080 for FullHD).
- W/H
- the values in these 2 boxes specify the size of the drag area box measured in pixels as shown in the compositor window. You can set these manually and if you can't see the location of your box or find your handles, set them to zero because 0 sets it to the same as the width/height of the media.
The Drag effect ignores all boundaries, including the Title Safe Region of the Compositor so that if you drag your titles off the screen, it will look like they disappeared completely. Reset X and Y to reasonable values to have it reappear. The Title text, background, and pngs are applied on a single layer so that they will drag together as an entity. All of the Title capabilities work in conjunction with dragging so if you want to justify the title, you can still use the Left/Center/Right/Top/Mid/Bottom within the drag area. Be sure to turn off Drag when rendering or the box will show in the video; keep in mind that drag bars do not appear until there is some text in the text box and you can not actually drag until the Title window controls are available.
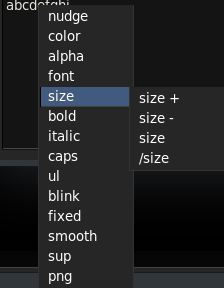
Figure 10.68:
Pulldown Attributes
|
|
- Attributes
- in the Text box where you type your Title information, you can now change several attributes to give you plenty of flexibility (figure 10.68). Each of these special attributes begin with an open angle bracket < and ends with a closing angle bracket >. Until the closing angle bracket is keyed in, the actual characters you type, will be seen in the compositor window. In addition, if you do not use the exact syntax or you keyin a filename that is not available, all of the characters will continue to show up. This helps to see what needs to be fixed or is missing. The attributes usage is described in the table below.
Table 10.2:
Titler attributes
|
|
|
|
|
|
|
Attribute name |
Attribute value |
Notes |
|
|
|
color |
color name such as RED from <cin_path>/guicast/colors.h |
Or use the hex value like #a000a0; color-hex.com shows examples |
|
|
|
font |
exact name from Font pulldown |
When you set font, bold/size and italic will be as currently set up |
|
|
|
alpha |
floating-point number between 0 and 1 |
0 is transparent; 1 is opaque |
|
|
|
size |
+ increases the size by
 , - decreases , - decreases
 or use a number > 0 but less than 2048 or use a number > 0 but less than 2048 |
Examples: <size +++>, or <size -> or <size 14.5> (floating-point ok) |
|
|
|
png |
filename of a .png file |
Example, add a logo. Full pathname needed if not in current directory |
|
|
|
bold |
1 for on (default) or use 0 for off |
Font used must have bold available |
|
|
|
italic |
1 for on (default) or use 0 for off |
Font must have italic already set up |
|
|
|
blink |
a number in seconds to flash on and off; a negative number for fade in and out |
Can be a floating-point number; <blink> with no value is like 1 |
|
|
|
ul |
underline 1 for on (default), 0 for off |
|
|
|
|
caps |
1 for on, 0 for off, -1 for lower case |
If no value set, treated same as 1 |
|
|
|
sup |
1 for superscript; 0 ends; -1 for subscript; positive bumps up by
 of font size; negative sinks by 1/2 of current size of font size; negative sinks by 1/2 of current size |
Size of text will be
 of font size; example: 12<sup 1>10<sup 0>; <sup> with no values, acts like 1 of font size; example: 12<sup 1>10<sup 0>; <sup> with no values, acts like 1 |
|
|
|
fixed |
number of pixels between characters; fixed with no value uses
 current size current size |
A fixed font is very useful for tables; /fixed reverts to previous fixed size |
|
|
|
nudge |
x,y to move the text by that amount; displacement is in number of pixels. Can be negative or positive |
Example: <nudge 8,8>abc</nudge> |
|
|
|
smooth |
add anti-aliasing to smooth jagged edges |
Turn off smooth for chroma key
|
|
|
|
|
|
|
|
|
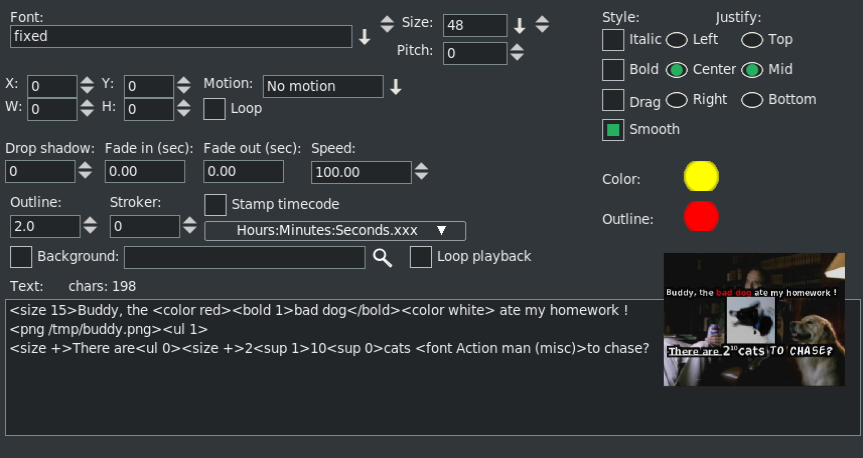
These attributes stay in effect until you change them or reset them. Additional cpu time is needed for the blink attribute because it requires redrawing every frame and for the background option described below. Note that some Title window controls can not be set, such as Justify and Outline color. The lines below are examples for testing purposes. The accompanying screenshot displays the corresponding CINELERRA-GG output.
Examples of Title line keyins:
Figure 10.69.
<size 15>Buddy, the <color red><bold 1>bad dog</bold><color white> ate my homework !<png /tmp/buddy.png><ul 1><size +>There are<ul 0><size +>2<sup 1>10<sup 0>cats <font Action man (misc)>to chase?
|
Figure 10.69:
Final result of the exemple
|
|
Besides the previously described <, >, and / characters, there are two special characters: backslash “\”, and the pound sign “#”. The backslash character is used for two things. With the advent of the attribute name and value, your line may become quite long so you can use “\” followed by the carriage return to continue on the next line as if it is just a single line. It also can be used to designate that the following character does not represent the beginning of an attribute. For example, if you want to use the opening angle character “<“ as a title character, precede it with the backslash character. The pound sign, “#”, designates the whole line as a comment or if in the middle of the line, then the rest of the line is a comment (this includes the carriage return).
- Background
- in this box you can keyin the name of a file of the type that CINELERRA-GG accepts and use that file as a background for your Title characters (media video or image). This will be seen in the compositor window on top of the video that is loaded in the main track canvas. Besides typing in the filename, you must also check the checkbox. This makes it easy to turn it On and Off to see what it looks like. Next to the background box is a Loop checkbox. If the background file takes less time than the main track canvas video to run, you can turn on the loop checkbox so that it runs over and over again to match the time size of your video. By default the background image will occupy the whole frame, but if we activate drag mode and create a box of the desired size, the image will occupy only the box leaving the rest of the frame visible.
- Stroker
- to add pen strokes to the text letters, adjust the stroke width numerically. This looks particularly nice on certain fonts and with a negative adjustment of the Drop shadow.
- Text: chars:
- to output and update the number of characters already used. The only limit to the number of characters based on a count of single 8 bit characters is the available resources on the user computer available for CINELERRA-GG use. Keep in mind that unicode or other special characters may consist of 2 to 4 8 bit bytes. Also, newlines are a character and any of the attributes you use count in the total. There is now a horizontal scroll bar as well as the vertical one in the textbox and they only appear when there are more lines or characters than can fit in the original sized textbox.
- Unicode Insertion
- if you want to enter a special character like the mathematical summation symbol, you can use the unicode equivalent to do so. Press Ctrl-Shift-U followed by 2022 and a carriage return is an example of the bullet. Refer to section 17.5 for details.
- Popup Helper
- put your cursor where you want to add an attribute, then right mouse will bring up a list of the available attributes for you to choose, along with a submenu to choose from. The program will insert that attribute for you and all you have to add is a value when required! (see figure 10.68).
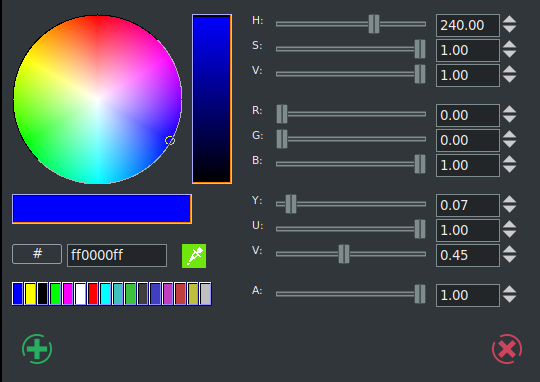
Color Picker Usage
The Text Color window has several enhanced features as listed here and seen in figure 10.70.
Figure 10.70:
Screencast showing the Color Picker menu.
|
|
- The hex value of the color you choose shows in the textbox and you can also keyin a value there.
- A small square next to the hex text box, is a green eyedropper color picker. Use the left mouse button to click on the square to enable picking and you will see it turn red to designate that it is enabled. Your cursor will switch to a two-colored reticle. You can now move the mouse around to choose a color anywhere on the screen and then click there to have it picked. If you hold down the right or left mouse button while moving, you can see the color changing in the vertical bar in the color palette area as you move to give you a bigger view of the actual color.
- A history of 16 of your last chosen colors is available to easily use again. Any time you choose a new color in any methodology, it will become the latest choice in the history either immediately or after checking OK/and leaving. History shows latest color starting left to right.
- Besides HSV, RGB, there is also a YUV color model to choose from.
- Several of these items may have associated Tool Tips.
Font Choice
The X Window system originally did not have a suitable font renderer for video. It also is restricted to the current bit depth. It does not have a convenient way to know which fonts work with the suitable font renderer in the desired bit depth. The easiest way we have found to support fonts in the titler is to have a directory for them at /usr/lib/cinelerra/fonts.
Or if not system installed, at <cinelerra_install_path>/bin/plugins/fonts.
In order to choose a font faster, you can keyin the first few characters of the font name, being sure to use capital characters if used since it is case-sensitive. The steps to follow are:
- next to the font box, click on the down arrow pulldown;
- keyin the first character(s) of the desired font and you will see the first match become highlighted;
- you can see the characters you keyed in the upper right corner of the fonts.
It is important to note that because there are checkboxes for both Bold and Italic, the pulldown will not include these specific fonts
as an addition to a Regular font. They will be used via the checkboxes but not viewed in the pulldown.
One last item of information about fonts that may lead to some confusion. The checkbox for Bold and Italic will occasionally be ghosted out if no bold or italic version of the selected font is available. This is no guarantee, but currently as good as it can get due to inconsistency in the creation of fonts. It is mostly just a hint. If boxes are checkmarked, but ghosted, you can not uncheck until you change to a font that does not ghost out the boxes. If you use the popup helper with the boxes checked, and attempt to keyin a font that does not have the bold/italic attribute as checked, the font will be considered illegal.
Also of note, if the video is displayed on a consumer TV, the outer border is going to be cropped by 5% on each side. To avoid text which is too close to the edge looking bad, you may want to enable the title-safe tool in the compositor window. The text should not cross the inner rectangle.
Font Addition / Font Subtraction
If using a compiled build (that is, NOT an AppImage) to add true type fonts, copy the .TTF files to the fonts directory at /usr/lib/cinelerra/fonts
or if not system installed, at <cinelerra_install_path>/bin/plugins/fonts. In that directory run
    # /usr/lib/cinelerra/fonts
    ttmkfdir && mv fonts.scale fonts.dir
|
and restart CINELERRA-GG. The new fonts should appear. However, keep in mind that the next
time you install a new version of CINELERRA-GG, your changes will be written over so
you will have to make sure to save them elsewhere and then re-establish.
The usage of ttmkfdir changes frequently so this technique might not work. The titler supports mainly TTF, true type fonts. It supports others such as OTF, but TTF are the most reliable.
AppImage does not provide this specific method unless you use the workaround as described in the Appendix FAQ, Known Problems and Workarounds.
However, if you use Ubuntu Studio 2304 with AppImage, you can easily add font files directly to /.fonts and you will have all of these available in the Title fonts list. And, there may be other operating systems with specific implementations that also allow for this easier methodology to add additional fonts.
Some of the system fonts are automatically included in the set of fonts being used by CINELERRA-GG. The easiest way to add additional system or other application available fonts for the Title plugin's set, is to use ones available in specific directories on your computer as long as they have a fonts.scale file already set up. You can run mkfontscale to create this file within that directory. In order to include a specific directory you set an environment variable before starting CINELERRA-GG which stays in effect until it is unset or until the next reboot. Below is the method and an example.
export BC_FONT_PATH=<colon-separated-search-path-for-fonts>
export BC_FONT_PATH=/usr/share/fonts
|
The current set of fonts in CINELERRA-GG's directory will be automatically included and will be the default set if this environment variable is not set. Keep in mind that if you add a lot of fonts, it will considerably slow down the startup every time you bring up the Title plugin.
If you want to only have a limited number of fonts set up, you can manipulate the CINELERRA-GG directory directly at <cinelerra_install_path>/bin/plugins/fonts.
Here you will find the default set of fonts that come with the install. Copy any other fonts you would like to include here with read permission, delete any fonts you do not want to have, then execute mkfontscale which creates the file fonts.scale that CINELERRA-GG will read. However, the next time you install a new version of CINELERRA-GG, your changes will be written over so you will have to make sure to save them elsewhere and then re-establish.
If you have problems with a specific font or set of fonts, there is a debug option available to determine which font is an issue. When starting CINELERRA-GG, you should set up the variable:
export BC_FONT_DEBUG=1	(default is 0 for no debug)
unset BC_FONT_DEBUG		(to remove debug messages)
|
Then start CINELERRA-GG from a terminal window to see the fonts being loaded and previewed in the Titler. This should point out any issues. Another debug methodology is to remove all fonts from being used and subsequently add in the ones that you want.
This not only speeds the load up, it ensures that the fonts you actually are using are the ones you expect because the order that
CINELERRA-GG finds various fonts makes a difference in which one of potential duplicates shows up in the
pulldown. So you might not see the one you expect if it was written over by a system font.
export BC_FONT_PATH=:   #(the : "colon" removes all automatic system and Cinelerra fonts)
export BC_FONT_PATH=:/usr/share/fonts #(remove all fonts and then add /usr/shar/fonts)
|
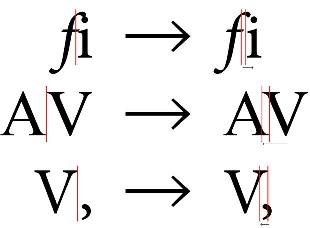
Kerning
When using the Titler, kerning is applied in order to allow parts of a letter to go outside the standard sized letter box. Kerning is the process of adjusting the space between individual letters. It is not the same as proportional spacing. In kerning, a bounding box is allowed to overlay another bounding box. The philosophy here is to aim at the ability to have boxes overlap in order to make the letters look more visually appealing. Bounding box and escapement are tracked separately. In addition to adjusting individual letter spacing, the program will also expand the render box in order to have any parts of the letter extend outside the standard letter box. Kerning is applied to any and all fonts (figure 10.71).
Figure 10.71:
Kerning in action
|
|
The CINELERRA-GG Community, 2021
https://www.cinelerra-gg.org