Subsections
Blue Banana
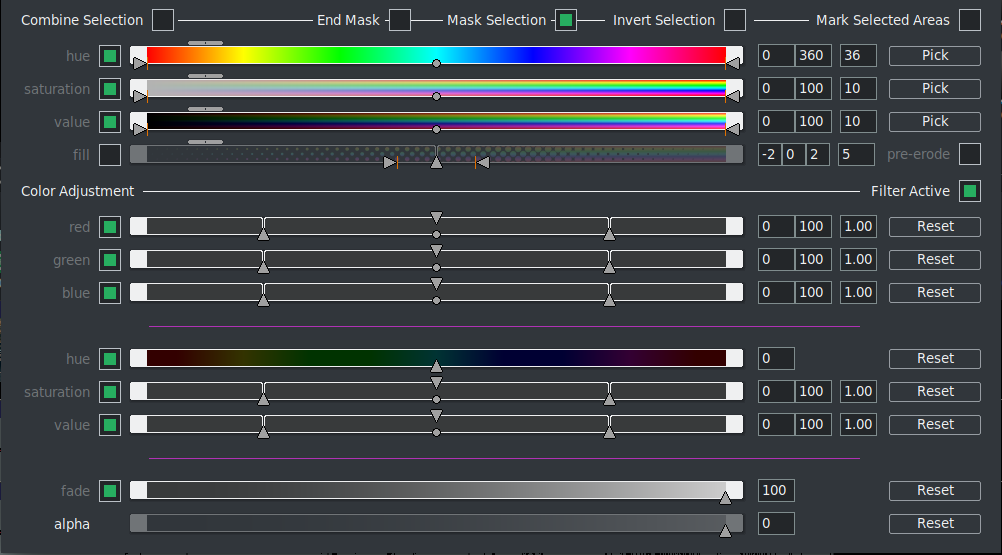
Blue Banana7 is an HSL Qualifier (HSL= Hue, Saturation, Luminance; HSV in our plugin, with V = Value), one of the basic tools of any grading software that are based on circumscribing a zone of the frame by extracting a chromatic key and producing a matte in the alpha channel (Secondary Color Correction). Blue Banana differs not by creating a real matte, but by creating a selection mask exclusively for use within the plugin. The three H, S and V sliders are called qualifiers. The BlueBanana plugin has a couple of useful purposes. It can be used for color transformation or remapping – by isolating a specific color and then performing color change/correction on only that color (or color ranges). Another useful purpose is for chroma-key filtering, using multiple BlueBanana plugins on the same track. Also, it can be used in conjunction with the mask operation of the Compositor. Usage of BlueBanana may seem complicated at first, but it is necessarily so in order to get enough control to produce the desired effect simply and quickly. Just changing a single color is actually quite easy. BlueBanana is keyframable (figure 10.28).
Figure 10.28:
Screencast showing the BlueBanana plugin control
|
|
The basic strategy for BlueBanana is to:
- Select a specific target color with the eyedropper tool.
- Create a selection region by expanding color ranges around that color.
- Optionally reduce or expand the alpha plane as a regional selection mask.
- Optionally apply a color remapping or transformation to the selection.
- Optionally reset the output alpha to opaque, or pass the alpha to another BlueBanana plugin.
Just a Warning Note:
BlueBanana may use a lot of CPU and Memory because it is doing a lot of work. If you turn off the plugin on the plugin bar below the video track in the main track canvas it will stop using cpu when not in use. Or once you uncheck Mark Selected Area, it will no longer be using the cpu to mark the selected color area in realtime while drawing the diagonal animated pattern in the compositor window.
Example Usage8
If you just want to try this, follow these steps.
- First —
- Choose your color.
- Load your video, add the BlueBanana plugin to the track, bring up its control window, and uncheck any checked boxes (mostly just to avoid unexpected results).
- In the Compositor window, choose the eyedropper color picker tool on the left-hand side and click on the area of the image that shows the color you want to change/correct.
- In the BlueBanana plugin window, to the right of hue, click Pick. And if you want to modify saturation and value, also click on the Pick button for them. To see what it does, Pick them also.
- Next, check the Mark Selected Areas box at the top right of the BlueBanana plugin window to see the selected color-matching areas which will become marked in a diagonally striped pattern.
- You can now manually modify your selection in the Color Selection area in the obvious ways for hue, saturation, value and fill. The arrows to each side of the small circle widen the selected area. Move the dot and you move the range. The slider on top of the horizontal color strip shifts like the amount of the strip is dedicated to that part of the color spectrum. Fill will fill more area or less area in your selected region.
- Second —
- Adjust your color choice.
- There are color strips under color Adjustment which will show color changes as you modify values.
- Uncheck Mark Selected Areas and check the Filter Active box to the right of Color Adjustment.
- As needed, you can individually check and uncheck all the various parameters using the boxes to the left of each line. Again, these are intuitive and broadly similar to the above. The arrows at the bottom widen the range, the circle at the bottom moves the range, and the top slider, which is an arrow this time, affects distribution. It provides a little histogram effect to give you an idea of what you are changing. The fade adjusts the level of color blending. The alpha is basically the opacity of your changes.
Definition of Wording/Checkboxes/Buttons/Operators are being described next. Some of the commentary was adopted from information provided by Monty Montgomery and from questions and answers from email by Igor Ubuntu, who did extensive testing.
Operational characteristics for the color-related adjusters:
- left arrow slider
- operates the range minimum (left edge); the numerical value shows in the left-most textbox.
- right arrow slider
- operates the range maximum (right edge); resulting numerical value is in the middle textbox.
- middle circle slider below
- can move the current range up or down and the numerical results will show in the left and middle textbox. Move the dot and you move the range.
- top pad slider
- operates the edge slopes (selection attack/decay) and the value will be displayed in the rightmost textbox. Sharp edges are represented by 0; 100 represents smooth edges. It is only for "Mask Selection" (Pane 1). It applies simultaneously to the left and right edges (symmetric).
- top arrow
- affects the distribution skew. It is the equivalent of Top Pad Slider for Pane 2 ("Color Adjusting").
Left/Right Arrow determine the edges of the color range. They are precise edges independent of each other, so we can get asymmetrical ranges with respect to the center of the interval indicated by middle circle slider below.
Operational characteristics for Fill:
- left arrow slider
- operates mask erosion filling. First textbox value.
- center up arrow slider
- operates the fill skew midpoint. Second textbox value.
- right arrow slider
- operates mask expansion filling. Third textbox value.
- top pad slider
- operates the edge slopes. Right textbox value.
The textboxes are available so that you can directly type in numbers from the color wheel. This could be helpful if duplicating previous work as it would be an instantaneous exact numerical match without having to continuously fine-tune the movement of a slider.
There are two panes separated by long horizontal lines (through the middle of the screen) in the control window of the BlueBanana plugin, clearly visible in the previous screencast. The top pane is first used to create/modify a selection, and the bottom pane is used to operate a change.
Pane 1
This section is used to select the target color domain. First, a short explanation about alpha. The alpha channel used in BlueBanana is not transparency (matte); it is used as the Selection mask. Alpha plane is the alpha channel of the current image. So that:
RGBA = red/green/blue color planes, alpha data plane.
YUVA = luma/Cb/Cr color values, alpha data plane.
The alpha data normally is input to the blending operations in the patchbay overlay mode. The alpha data usually creates the appearance of stacking order, and determines which color planes are visible in the rendered result. When BlueBanana is used, the meaning of the alpha data is changed to the selection. It is useful to think of the alpha data as more solid then it is transparency in blending, and more selected when it is used in BlueBanana. In both cases, the greater the alpha value, the more the effect is expressed.
Usually, alpha is normalized to a range from 0 to 1, zero = no effect, 1 = total effect, 0.5 = partial effect. In both cases, alpha is what math people call an auxiliary variable. It is needed, but is not part of the answer. In this case, the answer is the visible rendered result. Alpha is like meta-data. Note that the "alpha" slider works with both "Filter Active" and "Mask Selection" checkboxes
checked. The "Filter Active" checkbox enables the options: red, green, blue, hue, saturation, value, fade, alpha. If "Mask Selection" is not checked "alpha" will not work.
Let us now examine the instruments in pane 1:
- Combine Selection
- The selection is the intersection or union of two pixel masks. Mathematically, A and B are normalized, (scaled to between 0 and 1) and used as selection mask weights.
Intersection(∩) = A×B
Union(∪) = A + B - A×B
where A is the input alpha plane as a mask, 1=selected, 0.4=partially selected, and 0=not selected; B is the color selection of trims and feathers made by varying the sliders.
The result is a new alpha plane, which will be output (if End Mask is not set). The 0...1 selection values are used to weight the color transformation filters if/when they are active and operate a change. The color adjustment filters available in Pane #2 can change red, green, blue, and remap hue, saturation, value in the pane. There is also fade which applies to the color channels and alpha which applies to the resulting alpha plane.
The basic plan is to either:
- reduce a selection area by intersection (Combine selection off)
A×B
- increase a selection area by union (Combine selection on)
A + B - A×B
- Mask Selection
- applies the current mask to the selection, such that the mask clips/expands the selection. When mask selection is enabled, the result of the and/or will be stored to the alpha result, but when mask selection is unchecked the mask is ignored and the selection is not modified. The selection is used to weight the effect of the filtering, or to control the output alpha.
- End mask
- only visible when Mask Selection is checked. End Mask causes the entire alpha plane to
be set to 1. The image becomes opaque. This is usually only set in the last plugin of a stack (the stack may be just one plugin doing only color modification). In the event that a color selection mask is used with multiple, layered BlueBanana filters on the same track, the grouped BlueBanana filters may share a single mask by all enabling Mask Selection, but with only the last BlueBanana enabling End Mask. This usage pattern gives the End Mask control its name.
- End Mask as used in Color Transformation/Remapping:
- In many use cases
where you are just remapping color, you are still interested in seeing all of the picture. If this is the case, then checking End Mask on the last BlueBanana plugin will show you the entire picture. The alpha plane may be in use as a selection mask, but it may not be wanted as part of the result.
- End Mask as used in Chroma-key Filtering:
- In cases where the selection is for a chroma-key, you are interested in the alpha channel for blending, like Normal or SrcOver. So for this usage of the BlueBanana, don't check the End Mask.
- Invert Selection
- reverse target color domain, which is 1 minus selection.
- Mark Selected Areas
- when this box is checked, the chosen colors are presented in an animated
diagonally striped pattern.
- Hue
- select a hue domain; click on the Pick button to select or check the box to the left of hue or uncheck to ignore.
- Saturation
- select a saturation domain; click on the Pick button to select or check the box to the left.
- Value
- select a value domain; click on the Pick button to select or check the box to the left.
- Fill
- will fill more area or less area of your selected region. This describes how it works. Fill control is an automated way of doing grow and shrink on the selected area, to fill in small holes in the middle of the selection, or to eliminate spurious pixels that are on the outer or inner edge of the selection. Be careful how much you shrink, because it can lead to edge segmentation with visible and annoying blocks of pixels. This is where Blur plugin can help. Blur should not be overdone so as not to create unsightly halos.
If none of the Hue, Saturation, or Value sliders are active – meaning that the whole frame is selected – the Fill slider will have no effect even when enabled. The word Fill will appear ghosted to indicate this.
The three lower handles in the fill slider correspond to Shrink (the left hand slider), Final (the middle slider), and Grow (the right hand slider). These are used in combination to alter the selection by first growing it by the amount specified by the right hand Grow slider, shrinking it to the amount specified by the left hand Shrink slider, and then growing it again to the final size specified by the middle Final slider. The top slider then feathers the resulting selection.
Growing the selection it has the effect of filling small holes in the selected area. Similarly, shrinking and then growing tends to remove small flecks of unwanted selection. The Final slider specifies the overall desired shrinkage or growth of the selection when finished. To specify a pure Grow or Shrink operation, set the Final slider and the Grow/Shrink slider to the same value and leave the other slider at zero.
- Pre-erode
- this control reverses the order of operation to Shrink, then Grow, then Final. The change is subtle on most images, but overall removes more small features because it first removes flecks before filling in holes.
Pane 2
This section is used to modify the color of your selection. Descriptive commentary for this pane.
- Filter Active
- checkbox to indicate that the modifications will be shown.
- Color Adjustment
- For Color Adjustment, RGB can be used as color weights while the HSV can transform color.
For the following items there are three sections on the slider. The center section represents the nominal 0% -100% range; the left section represents negative values, and the right section represents values greater than 100%. Values can be out-of-range within BlueBanana without clipping, but they will clip once they leave the plugin.
- RGB
- affect the color channels individually.
- Red
- modification color; click the Reset button to revert to default. Values are reflected in numerical textboxes on the right-hand side.
- Green
- modification color; click the Reset button to revert to default. Values are reflected in numerical textboxes on the right-hand side.
- Blue
- modification color; click the Reset button to revert to default. Values are reflected in numerical textboxes on the right-hand side.
- HSV
- reorient the color spectrum, and affect all of the color channels simultaneously.
- Hue
- a single numerical value will appear in the right-side box. Click the Reset button for default.
- Saturation
- for modifying the saturation; click the Reset button to revert to default. Values are reflected in numerical textboxes on the right-hand side.
- Value
- for modifying the value; click the Reset button to revert to default. Result is reflected in the numerical textboxes on the right-hand side.
- Fade
- controls the entire color re-mapping, and does nothing if no color adjustment is active.
- Alpha
- controls the output alpha (this is not available when End Mask is set); click the Reset button to revert to default. Result is reflected in the numerical textboxes on the right-hand side.
- In Pane 1, for mask selection creation, you can also use only one or two (checked or Pick button) of the three qualifiers Hue/Saturation/Value. With Hue alone you get a precise range of hues. With Saturation you select those saturation values for all hues, and with Value you do a "Luma Key," that is, you isolate only certain gray values. It may be useful to start with only one qualifier, and then gradually activate the others; but there are important cases that require all three bars. For example, skin tones, which are always characterized by a mixture of shadows, highlights, and different levels of saturation.
- Hue and Saturation Qualifiers can be inaccurate if the file is highly compressed and with Subsampling type 4 : 2 : 0. There are indeed blocks and macroblocks of pixels, visible especially along the edges, that disturb the creation of the selection mask. Better to use high quality files at least 4 : 2 : 2, better still 4 : 4 : 4. The brightness Y channel, on the other hand, is always at the highest quality (4). The presence of color noise can also be a problem because it creates spurious pixels. A tip may be to work on and enhance the clip before applying Blue Banana.
- If there are unwanted (spurious) selections in the frame that are small and far from the main selection, they can be eliminated or minimized with some Blur. Larger spurious selections can be eliminated by masking them (with the Mask selection option enabled in Blue Banana and with the Apply mask before plugins option in Mask tool). This is an action analogous to garbage matte in Chroma Key. If there are many spurious areas, perhaps with complex motions, it is best to mask only the selection we are interested in and then bring the Fade slider to -100 to reverse the mask.
- To select multiple colors in the same clip we can use multiple instances of Blue Banana.
- Once a satisfactory selection mask has been created, scroll through the entire clip to see the presence of artifacts, defects, or spurious areas in the other frames.
- It is known that primary Color Correction precedes secondary CC. However, if we use primary CC tools that cause the highlights and deep blacks to clip, for example the histogram, we will get clipped areas that then, in secondary CC, cannot be recovered. We can then first do a secondary CC for the areas near the white point and the black point using Blue Banana which works at 32bit Float. For example, we can turn down the highlights so as to reveal details and the same can be done in the shadows. Once we have worked in these details without causing clipping (that is, reported within the standard range) we can switch to primary CC.
Let's see two examples of HowTo:
BlueBanana Use Case #1: (Color Transform/Remapping)
- Load a video track, and add the BlueBanana plugin to your video. The alpha channel is usually all opaque. This serves as an initial full screen selection mask.
- Open the controls, and start with all boxes unchecked. Now reduce the selection using the top pane in intersection mode (that is Combine Selection is unchecked) to begin the effect.
- Use the eyedropper on the compositor window to choose a particular color.
- Click on the 3 plugin Pick boxes on the right side of each line of HSV to get the color selection.
- Check Mark Selected Area. The affected zones will be identified on the composer.
- Adjust the selection using the HSV and Fill sliders of the top pane. The selection mark will be updated as you operate the controls. The composer mask striping will be strongest as the mask is nearer full selection.
- Now uncheck Mask selected area & check Filter Active to begin Color Adjustment.
- Enable any needed colorspace modifiers, RGB / HSV sliders, and setup the color changes by moving the sliders. The current output may be the desired output.
- Enable Mask Selection and the alpha output will pass the selection mask to the image alpha channel. This can be used as a very flexible chroma-key filter. It also allows more plugins to be stacked and more selection information to be added, either by intersections or unions with other selections.
- End Mask simply sets the output image alpha to opaque. This is normally used to end a stack of BlueBanana plugins, and render the entire image with a complex selection.
BlueBanana Use Case #2:
This case uses stacked BlueBanana plugins working like chroma-key filters. It assumes you have already learned how to operate the plugin.
- Bring up 2 tracks of video media – one for foreground and one for background.
- Add 2 BlueBanana plugins on the first track. Turn off all checkboxes in both plugins.
- On the top plugin, use the top pane to create a selection mask, using Mark Selected Areas.
- Turn off top plugin Mark Selected Areas, and disable the top plugin via the plugin title bar on/off.
- Create another selection using the second plugin's mask, using Mark Selected Areas.
- Turn on the top plugin. Make sure both plugins Mark Selected Areas is off.
- Check Mask Selection and Filter Active in both.
- Check Combine Selection on second BlueBanana to see the final results.
You will see that there is intersection of the full plane with the first chosen regions, so the alpha = 0 everywhere but the area you picked and you see through. And alpha = 1, where the intersection selection was 1. The Normal blend shows you the track on top in these regions (the foreground track where alpha = 1).
If you are building an alpha selection mask by first intersection and then union, the top BlueBanana should not change the colors or the bottom plugin will need to target the remapped colors since that is the input to the lower BlueBanana.
Footnotes
- 7
- credit to Monty Montgomery programmer
- 8
- from original message by Rebecca
The CINELERRA-GG Community, 2021
https://www.cinelerra-gg.org