Cropping
Cropping is used to reduce the visible picture area by changing the output dimensions, width and
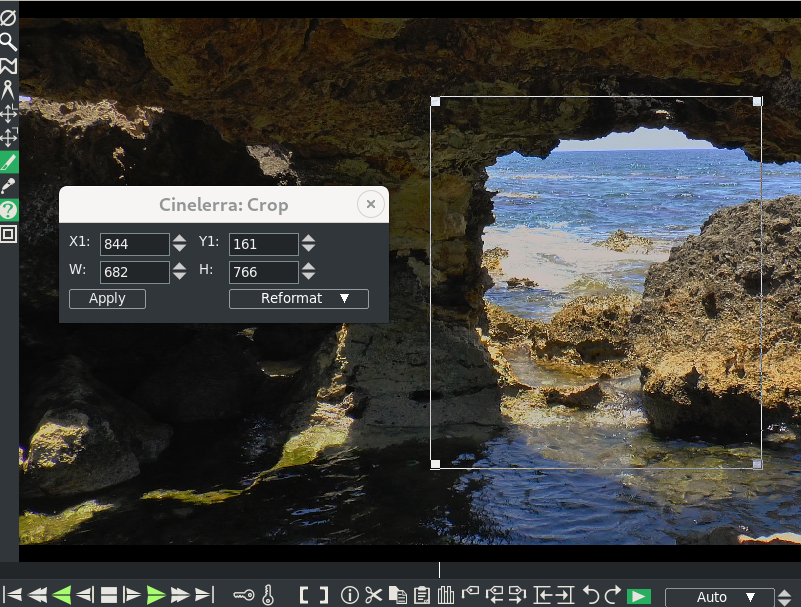
height in pixels, and the X, Y values. An example of cropping and the crop menu is seen in
figure 2.17.
The easiest way to use cropping is to click with the LMB
at the spot to begin cropping and while holding down the LMB, drag the mouse. This creates a rectangular
cropping area. To change the size/location of that area, click on any of the 4 corner points
with the LMB and drag. While dragging, you will see
the X1, Y1 coordinates and W for width, H for height, in the Crop tool popup menu
automatically change numerical value to reflect the current position. For precise locations, you
can keyin exact values into those textboxes instead of using the mouse.
Once you have the crop area defined as you want it, then click on the Apply button to have
the actual cropping take affect.
There are 3 choices of crop methods to choose in the menu pulldown on the bottom right side.
- Reformat - Reformat Session crops and changes the Format for the entire session.
Because the Format is changed, this is applied to all tracks in the project.
The part of the image outside the rectangle will be cut off and the projector will make the video fit.
The Settings
→ Format window will show the new project Width and Height values and
the projector tool window will show the new X, Y values. Track size remains unchanged.
You can undo the cropping by entering the original project dimensions in the
Settings
→ Format window for the Width and Height. You will also have to use the Projector
tool in the Compositor toolbar to Ajdust projector automation by clicking on the Reset icon.
- Resize - Resize Projector; to undo this, enable Adjust projector automation
and do a Reset.
- Shrink - Resize Projector and Camera; to undo this, enable each of the Adjust
projector and camera automation tools, one at a time, and do a Reset in the menus.
An important note here is that the original aspect ratio will be maintained so if your frame is
rectangular (as many are) and you "crop" by surrounding the region of interest with a square,
the cropped area will be more than you marked in order to keep the aspect rectangular shape.
The Resize and Shrink options are applicable to all video tracks except the disarmed ones.
This is in contrast to the Reformat option, as mentioned previously, which applies to all tracks even if disarmed because it changes the Format for the session.
One last note of interest, this cropping is keyframable.
Figure 2.17:
Crop menu and outlined crop rectangle on the right side
|
|
An easy to follow step by step usage of the cropping tool is outlined next.
- Enable the crop tool in the compositor window to display the Crop popup menu.
- Click-drag in the video to define the crop area which draws a rectangle on the video.
- Click-drag in the video to start a different rectangle instead.
- Click-drag on a corner of the rectangle to reposition that corner.
- Alt-click in crop rectangle to translate the rectangle to a different position without resizing.
- The crop popup menu allows text entry of the top left coordinates (X1, Y1) and width and
height (W, H) that define the crop rectangle.
- Choose one of the 3 options of Reformat, Resize, or Shrink.
- When you have the rectangle where you want it,
click on the Apply button in the menu to actually perform the crop operation.
The CINELERRA-GG Community, 2021
https://www.cinelerra-gg.org