Subsections
Motion
Note: Motion and Motion51 plugins are complex and slow to use for video stabilization. If you are stabilizing an entire video, you may want to preprocess by using ffmpeg's vidstabdetect and vidstabtransform plugins before importing the video into CINELERRA-GG.
The motion tracker is almost a complete application in itself. The motion tracker tracks two types of motion: translation and rotation. It can track both simultaneously or one only. It can do
 pixel tracking or single pixel tracking. It can stabilize motion or cause one track to follow the motion of another track. Although the motion tracker is applied as a realtime effect, it usually must be rendered to see useful results. The effect takes a long time to precisely detect motion so it is very slow.
Motion tracker works by using one region of the frame as the region to track (Match Box). It compares this region between 2 frames to calculate the motion. This region can be defined anywhere on the screen. Once the motion between 2 frames has been calculated, a number of things can be done with that motion vector. It can be scaled by a user value and clamped to a maximum range. It can be thrown away or accumulated with all the motion vectors leading up to the current position.
To save time the motion result can be saved in a file for later reuse, recalled from a previous calculation, or discarded. The motion tracker has a notion of 2 tracks, the master layer and the target layer. The master layer is where the comparison between 2 frames takes place. The target layer is where motion is applied either to track or compensate for the motion in the master layer (figure 10.57).
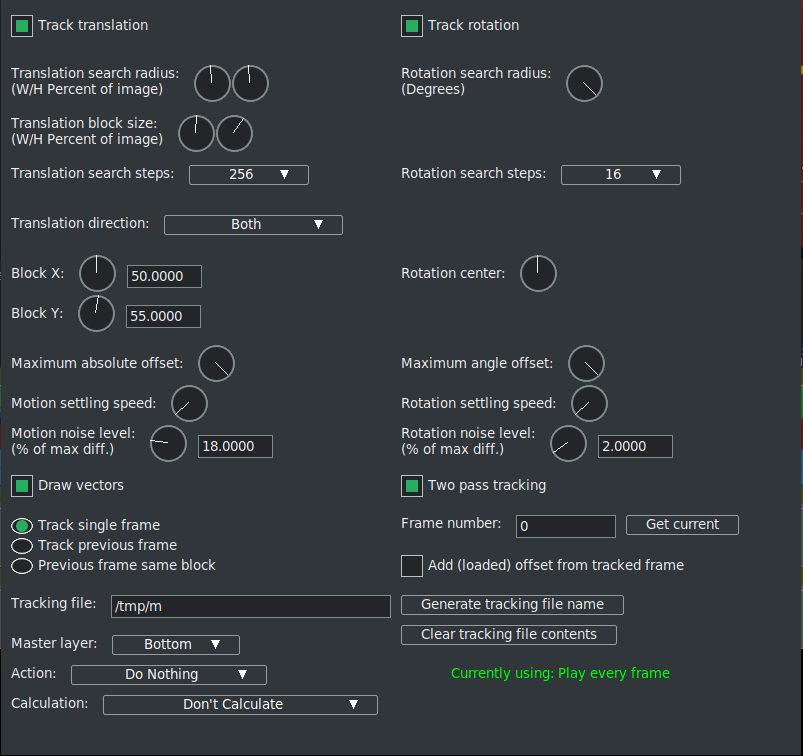
Figure 10.57:
Motion plugin GUI
|
|
Motion tracking parameters12:
- Track translation
- Enables translation operations. The motion tracker tracks X and Y motion in the master layer and adjusts X and Y motion in the target layer.
- Translation block size
- For the translation operations, a block is compared to a number of neighboring blocks to find the one with the least difference. The size of the Match Box to search for is given by this parameter.
- Translation search radius
- The size of the area to scan for the translation block.
- Translation search steps
- Ideally the search operation would compare the translation block with every other pixel in the Translation search radius. To speed this operation up, a subset of the total positions is searched. Then the search area is narrowed and re-scanned by the same number of search steps until the motion is known to
pixel accuracy.
- Translation direction
- Tracking translation is possible in any direction, or in horizontal or vertical direction only, depending on this selection.
- Block X, Y
- These coordinates determine the center of the translation block based on percentages of the width and height of the image. The center of the block should be part of the image which is visible at all times.
- Maximum absolute offset
- The amount of motion detected by the motion tracker is unlimited if this is 100. If it is under 100 the amount of motion is limited by that percentage of the image size.
- Motion settling speed
- The motion detected between every frame can be accumulated to form an absolute motion vector. Settling speed determines how fast the accumulated translation fades away, and the image resettles to its actual appearance. If the settling speed is 0% the total absolute vector is added to the next frame. So every frame that is processed accumulates the whole motion of the past. If the settling speed is 100% the absolute vector is cancelled completely, adding no past translation to the next frame. If the settling speed is intermediate between 0% and 100% the absolute vector is downscaled by (100 - settling amount) before being added to the next frame.
- Track rotation
- Enables rotation operations. The motion tracker tracks rotation in the master layer and adjusts rotation in the target layer.
- Rotation search radius
- This is the maximum angle of rotation from the starting frame the rotation scanner can detect. The rotation scan is from this angle counterclockwise to this angle clockwise. Thus the Rotation search radius is half the total range scanned.
- Rotation search steps
- Ideally every possible angle would be tested to get the rotation. To speed up the rotation search, the Rotation search radius is divided into a finite number of angles and only those angles compared to the starting frame. Then the search radius is narrowed and an equal number of angles is compared in the smaller radius until the highest possible accuracy is achieved. Normally you need one search step for every degree scanned. Since the rotation scanner scans the Rotation search radius in two directions, you need two steps for every degree in the search radius to search the complete range.
- Rotation center
- Usually this parameter is zero, and the rotation search
range is + / - Rotation search radius. Otherwise, it shifts the rotation search range to the area of angles between (Rotation center - Rotation search radius) and (Rotation center + Rotation search radius).
- Maximum angle offset
- The total accumulated amount of rotation is unlimited
if this is 90 degrees. If it is under 90, the total amount of rotation is
limited by the given maximum angle.
- Rotation settling speed
- This parameter determines how fast the accumulated
rotation fades away. Analogously to the Motion settling speed, if it is 0%,
the total accumulated rotation is added to the next frame, and every frame
accumulates the whole rotation of the past. If the settling speed is 100%,
no past rotation is added to the next frame. If the settling speed is
intermediate between 0% and 100%, the amount of accumulated rotation is
downscaled by (100 - settling amount) before being added to the next frame.
- Motion noise level
- This parameter allows to compensate such undesirable
behavior when motion tracker wildly springs away because some outlying area
of a noisy picture becomes accidentally more "similar" to the reference
picture than the right one. If noise level is set to 0% (its normal value),
then it is not taken into account at all. When it is set to 100%, then
similarity of the match block contents is totally ignored, and the current
motion vector will be zero. An intermediate value between 0% and 100%
defines the proportional noise level between minimum and maximum difference
of all examined match block positions. From all such positions whose
difference is found below noise level, that one is chosen which has the
shortest translation relative to the reference frame.
- Rotation noise level
- This parameter has similar meaning to the Motion noise level. It influences rotation tracking. If set to 0% (its normal value),
it is not taken into account. The 100% setting completely suppresses
rotation detection. An intermediate value between 0% and 100% defines the
proportional noise level between minimum and maximum difference of all
examined rotated match blocks from that of the reference picture. From all
rotation angles whose match block differences are found below noise level,
that one is chosen which has the minimum rotation angle relative to the
reference frame.
- Draw vectors
- When translation is enabled, 2 boxes are drawn on the frame. One box represents the translation block. Another box outside the translation block represents the extent of the Translation search radius. In the center of these boxes is an arrow showing the translation between the 2 master frames. When rotation is enabled, a single box the size of the rotation block is drawn rotated by the amount of rotation detected.
- Two pass tracking
- Although this parameter can be enabled at any time, it is useful only while simultaneous tracking both translation and rotation, when
the rotation amount is large. The normal tracking algorithm firstly
examines translation, then rotation. However, comparison of a strongly
tilted picture with the reference one can lead to rather inaccurate
determination of the translation vector. The subsequent determination of
rotation will be also inexact because of the preceding translation error. The
second tracking pass, if enabled, refines translation and rotation.
If motion and/or rotation noise level is set above 0% and Two pass tracking
is enabled, then both noise levels affect the first tracking pass only.
During the second tracking pass of two pass tracking both noise levels are
ignored.
It should be noted that two pass tracking is not twice slower than the usual
single pass tracking. Actually it is only about 40% slower. As the second
pass serves only for motion refinement, it starts from the reduced search
range for block positions and rotation angles. And, as the first pass only
yields an approximate position, which will be later refined during the
second pass, it skips subpixel position search and examines rotation angles
with the accuracy reduced to 1 degree.
- Track single frame
- When this option is used the motion between a single
starting frame and the frame currently under the insertion point is
calculated. The starting frame is specified in the Frame number box. The
motion calculated this way is taken as the absolute motion vector. The
absolute motion vector for each frame replaces the absolute motion vector
for the previous frame. Settling speed has no effect on it since it does
not contain any previous motion vectors. Playback can start anywhere on the
timeline since there is no dependence on previous results. We talk about
Keep shape and it is the most precise way to calculate the motion vector;
but it only works well when the object to be traced does not change along
the clip, remaining identical in shape, size and luminance.
Strong rotation of the picture can also have a bad impact on the tracking
accuracy. If it is the case, accuracy can be significantly improved by
enabling Two pass tracking.
- Frame number
- The number of the reference frame used for motion tracking in
the Track single frame mode is specified in this input field. Frame
number is set as the 0-based absolute number starting from the very
beginning of the whole timeline. Instead of manual calculating, it is
possible to get Frame number directly from the current cursor position by
pressing the Get current button.
- Get current
- Pressing this handy button provides a convenient way to set the
Frame number parameter to the value of the current cursor position.
- Add (loaded) offset from tracked frame
- This toggle can help when the tracked
object changes shape, leaves the screen area or becomes obscured by other
objects somewhere in the middle of the Motion effect. Sometimes it can help
also if a strong rotation causes the motion tracker to miss the right
tracked object and wildly spring away.
To overcome this problem, one has to define two keyframes: the first one at
the start of the Motion effect, the second shortly before the problematic
location in the clip. At the first keyframe one defines the Motion effect
parameters as usual, the Add offset toggle being switched off. At the
second keyframe the match block can be redefined to cover another region of
the picture which remains visible during the following part of the effect.
The Frame number parameter should be set several frames before position of this second keyframe, and the Add offset toggle switched on.
After defining the two keyframes (even more can be added in the similar way)
one switches at all the defined keyframes Calculation mode to Save coords
to tracking file, Action mode to Do Nothing, rewinds the timeline cursor
to the beginning of the Motion effect, and starts playback. The determined
motion vectors will be written to the tracking file, the Add offset
parameter having no effect during the save stage.
After playback finishes and all the relevant motion vectors are saved in the
tracking file, one switches at all the defined keyframes Calculation mode to
Load coords from tracking file, Action mode to whatever one needs, rewinds again to the beginning of the Motion effect and starts playback or
rendering. After reaching the second keyframe, where Add offset was
switched on, the program continues to follow the second object adding the
total motion and rotation, accumulated so far.
Of course, the Add offset toggle can be used in the Track single frame mode only. In the other tracking modi such a technics is unnecessary.
- Track previous frame
- Causes only the motion between the previous frame and
the current frame to be calculated (Follow shape). This is added to an
absolute motion vector to get the new motion from the start of the sequence
to the current position. After every frame processed this way, the block
position is shifted to always cover the same region of the image. Playback
must be started from the start of the Motion effect in order to accumulate
all the necessary motion vectors. This method is less precise because you
have error propagation between frames. However, it is essential when the
object changes shape, size or luminance. Possible inaccuracies caused by
rotation of the picture can partly be reduced by enabling Two pass tracking
- Previous frame same block
- This is useful for stabilizing jerky camcorder footage. In this mode the motion between the previous frame and the current frame is calculated. Instead of adjusting the block position to reflect the new location of the image, like Track Previous Frame does, the block position is unchanged between each frame. Thus a new region is compared for each frame.
- Master layer
- This determines the track which supplies the frames for the
motion calculation. If it is Bottom the bottom track of all the tracks
sharing this effect is the master layer. Then the top track of all the
tracks is the target layer. And vice versa, if the master layer is Top,
then the target layer is bottom.
- Calculation
- This determines whether to calculate the motion at all and
whether to save it to disk. If it is Don't Calculate the motion calculation is skipped. If it is Recalculate the motion calculation is performed every time each frame is rendered. If it is Load coords from tracking file, the motion vectors are loaded from a previous save calculation. If the previous save calculation does not provide the data for the currently processed frames, a new motion calculation is performed for that frames. If Calculation mode is Save coords to tracking file the motion vectors can be still loaded from disk if the previously
calculated data exist. Otherwise, a new motion calculation is performed,
and the calculated motion vectors are saved.
- Tracking file
- This parameter determines the name of the file where the
motion data are saved and/or loaded from. By default it is /tmp/motion
but it can have any name and reside anywhere on the disk. Tracking file is
a text file where each line contains four numbers: the absolute frame number
(0-based integer), the X and Y translation displacements of subpixel
precision (a subpixel is
pixel in size, and to give integer values of X and Y these subpixel coords are multiplied by 4), and the rotation angle in
degrees (as a floating point value). The user may have different tracking
files for different timeline regions, it is possible to do any manipulations
on them if necessary and even manually edit in a text editor.
- Generate tracking file name
- This handy pushbutton suggests a tracking file
name based on the name of the current asset. It helps to maintain more
different tracking files with unique but predictable names used in the same
project. When tracking file name is changed (either via the pushbutton or
after entering it in the corresponding input field), the contents of that
files (both the old and the new ones) remains unchanged.
- Clear tracking file contents
- The values and meaning of the saved motion data depend on such a bunch of parameters, they can be even edited manually, so
one can hardly predict whether the outdated motion vectors are to be reset
or left untouched. Therefore the existing motion data are never altered
implicitly (only newly calculated data may be added). And, should the user
need to reset them here and right now, it is possible to clear the given
tracking file contents explicitly by pressing this pushbutton.
As protection against accident clearing tracking file contents, right before
clearing the program ensures closing the current tracking file and renames
it to the same name with the suffix .old. This way, the user can undo an erroneous clearing action by manual restoring the saved file.
- Action
- Once the motion vector is known this determines whether to move the target layer opposing the motion vector or following the motion vector. If it is Do Nothing the target layer is untouched. If it is Track... the target layer is moved by the same amount as the master layer. This is useful for matching titles to objects in the frame. If it is Stabilize... the target layer is moved opposite to the motion vector. This is useful for stabilizing an object in the frame. The Motion operations can be accurate to single pixels or subpixels by changing the Action setting.
As motion tracking works consistently only in the Play every frame mode,
the corresponding info on the current playback mode is shown in the bottom
right edge of the effect dialog. The needed playback mode is defined in the
Preferences dialog of CINELERRA-GG main window.
Secrets of motion tracking
Since it is a very slow effect, there is a method to applying the motion tracker to get the most out of it. First disable playback for the track to do motion tracking on. Then drop the effect on a region of video with some motion to track. Then rewind the insertion point to the start of the region. Set Action
→ Do Nothing; set Calculation
→ Don't calculate; enable Draw vectors. Then enable playback of the track to see the motion tracking areas.
Enable which of translation motion or rotation motion vectors you want to track. By watching the compositor window and adjusting the Block X, Y settings, center the block on the part of the image you want to track. It is advisable to choose elements that have evident edges in the x and y directions because the calculations are made on these coordinates. Then set search radius, block size and block coordinates for translation and rotation.
Once this is configured, set Calculation to Save coords and do test runs through the sequence to see if the motion tracker works and to save the motion vectors. Next, disable Draw vectors, set the motion Action to perform on the target layer and change Calculation to Load coords.
When using a single starting frame to calculate the motion of a sequence (Keep Shape), the starting frame should be a single frame with the least motion to any of the other frames. This is rarely frame 0. Usually it is a frame near the middle of the sequence. This way the search radius need only reach halfway to the full extent of the motion in the sequence. The suitable reference frame number can be defined conveniently via the Get current pushbutton.
Summarizing:
- In the Master Layer create and save the tracking file:
- Draw vectors: checked
- Action: Do Nothing
- Calculation: Save coords to Tracking File
- Clone the track, which becomes the Target Layer. The Motion plugin will also be copied.
- Draw vectors: unchecked
- Action: Do Nothing
- Calculation: Load coords from Tracking File
- Add a third track to place the video of the object to be superimposed. Add the shared effects of the Motion plugin taken from the Master Layer.
- Draw vectors: unchecked
- Action: Track Subpixel
- Calculation: Load coords from Tracking File
If the motion tracker is used on a render farm, Save coords and Previous frame mode will not work. The results of the Save coords operation are saved to the hard drives on the render nodes, not the master node. Future rendering operations on these nodes will process different frames and read the wrong coordinates from the node filesystems. The fact that render nodes only visualize a portion of the timeline also prevents Previous frame from working since it depends on calculating an absolute motion vector starting on frame 0.
2 step motion tracking
The method described above is two-step motion tracking. One step is used just to calculate the motion vectors. A second step is used to apply the motion vectors to the footage. This is faster than a single pass because errors in the motion vector calculation can be discovered quickly. This also allows the motion tracking to use a less demanding colormodel like RGB888 in the scanning step and a more demanding colormodel like RGB Float in the action step. The scanning step takes much longer than action. This has the disadvantage of not being practical for extremely long sequences where some error is acceptable and the picture quality is low to begin with, like stabilizing camcorder footage.
The slower method is to calculate the motion vectors and apply them simultaneously. This method can use one track as the motion vector calculation track and another track as the target track for motion vector actions. This is useful for long sequences where some error is acceptable.
Pre-processing the shot
- The Motion plugin uses luminance to do its own calculations, so we can edit the clip to enhance contrast and make it easier to calculate motion vectors. You can even create a copy of the monochrome clip and optimize it for the plugin. It lengthens the time but minimizes errors. The saved file can then be used for the original clip.
- Correct lens distortion, especially if the object to be tracked moves to the edges of the frame.
- Study the entire shot well: if necessary, divide it into many edits, each with its own Motion plugin. For example, if the object to be tracked leaves the frame or is covered by some other element or changes in shape, size or rotation. You can try to use the Offset Tracking technique described below.
Using blur to improve motion tracking
With extremely noisy or interlaced footage, applying a blur effect before the motion tracking can improve accuracy. Either save the motion vectors in a tracking pass and disable the blur for the action pass or apply the blur just to the master layer. You can even use a copy of the track formed only by the channels of Red + Green, because the channel of Blue is the noisiest. Another trick is to enlarge the Match Box to minimize the effect of noise.
Using histogram to improve motion tracking
A histogram is almost always applied before motion tracking to clamp out noise in the darker pixels. Either save the motion vectors in a tracking pass and disable the histogram for the action pass or apply the histogram just to the master layer. Finally, you can use the histogram to increase contrast.
Using two pass tracking to improve accuracy and stability
A common source of inaccuracy when tracking single frame is rotation of the
picture. Ideally, the motion vectors should be determined by checking all
possible rotation angles at every possible match block location. But such
an algorithm would be unacceptably slow. Therefore the program finds for
each frame the translation vector first, and then the rotation angle. A
strong rotation can prevent motion tracker from finding accurate translation
displacements. Then the subsequent rotation search will be also inaccurate
because translation has been estimated not sufficiently well. In the Two
pass tracking algorithm the first, coarse estimation of translation and
rotation is followed by the second, refinement pass yielding more exact
motion vectors.
Sometimes, particularly if the amount of rotation is large, the translation
tracker can lose its right object and wildly spring away. Then the
following strategy may help.
Firstly switch Two pass tracking off, Track rotation off, set Motion noise level to zero. Switch Draw vectors on, Action: Do Nothing, Calculation: Save coords to tracking file. Start playback and watch if the motion tracker has problems finding the right displacements (you can also examine the tracking file afterwards on the existence of discontinuities in coordinates). If there are such, try to increase Motion noise level, let's say, to 10% or 20%, clear tracking file contents, repeat playback and look if tracker does not spring away any more. A single pass translation tracking can be relatively fast, while tracking rotation is expensive.
When a sufficient motion noise level is found, switch Track rotation on, Two
pass tracking on, clear tracking file contents and perform the complete
translation + rotation tracking pass. As the refinement pass uses
restricted search area and ignores the noise level parameters, the result
should be more stable and accurate.
Possible sources of errors
- Search radius too small:
- the traced object moves too fast with respect to the size of the search box set.
- Search radius too large:
- The search box is so large that it also collects other similar items in the frame.
- Occlusions:
- the traced object is temporarily hidden by some other element. Offset tracking or splitting of the video into several homogeneous clips is required.
- Focus change:
- you may get errors if the object changes its focus. The video must be divided into several homogeneous clips.
- Motion Blur:
- blurs the object making the calculation of the motion vector less precise. Very little can be done.
- Shape change:
- you can use Track previous frame or the subdivision of the video in more homogeneous clips.
- Lighting change:
- Contrast change can produce errors. Track previous frame or color correction can be used to return to the initial illumination.
Tracking stabilization in action
This is an explanation of how to stabilize a video as in the case of a video taken from a vehicle.
First select on the timeline the part of the footage you want to stabilize, using the in and out points. Then apply the Motion effect on that part of the video. Select the Previous frame same block option. That option is recommended for stabilizing jerky camcorder footage. Its goal is not to follow an object. The block stays exactly at the same place during all the effect length.
Enlarge the block and select almost half the size of the video. Select the Stabilize subpixel option as it will give a finer stabilization. Reduce the Maximum absolute offset value to limit the stabilization amplitude. You probably prefer to get a non-perfect stabilization on some places on the video rather than having a very large black border on one side of the picture during big shakes. Set the Translation search steps value to 128. Increasing that value will not give a better result and only considerably increases the rendering time. Make sure the Draw vectors option is selected, and render the part of the video where the Motion effect is applied.
If the result is good, deselect the Draw vectors option so that the block and vectors are not drawn anymore on the video. Then, render your video to a .dv file, and import it into your project. You will notice the video is stabilized but there are black borders which appear on sides of the frame. You have to zoom in and define projector keyframes to move the projector around the screen, in order to remove those black borders. The more your footage is jerky, the more you have to zoom in to discard the black borders. That is why the result is better with HDV footage than with DV footage.
An interesting side note about Add offset usage is explained next13
To stabilize video, the Motion plugin uses a tracking frame to which to track to and a region within that frame to track (generally an object in the background) in the current frame. When the region is obscured, often by something in the foreground or by leaving the screen, then the motion compensation would fail, and the video jumps all over the place.
You set a second region to track, and then add offset.
This shows how it is used. It works very well:
------k-------k-----------------
^      ^^
A      BC

A - object1 is visible in the background up until C
B - (the frame before C) has both object1 and object2 visible
C - has only object2 visible
- Make a keyframe and set to track object1.
- Make a keyframe at C and track frame at B, set to track object2.
- Set keyframe at C to add offsets that were calculated at B.
Tips
- Motion plugin14 algorithm in CINELERRA-GG is rather difficult to understand (the most efficient way to understand it is to look inside its C++ code:). Moreover, it has some tricks that, although can be derived knowing the details of the algorithm, are absolutely non-intuitive by themselves. Moreover, it is rather slow, and the results cannot be visible immediately while altering the settings.
- The Motion plugin cache (or motion vector or tracking file) sometimes allows to play with very sophisticated techniques. For example, by editing the cache, perhaps with some custom script, you can induce some kind of motion which would be difficult to make in other way. But in the same time the existence of the cache file can trigger user's mistakes. So you must always pay attention, which cache file may be used in the moment. //
Motion's cache data are absolute-frame-number based. If you insert some small piece of video before that where the plugin was attached, the frame numbers get displaced relative to the cached numbers, and the result may become incorrectly stabilized.
- The motion vector is a text file located in /tmp. We can open it with a plain editor and modify the wrong X Y coordinates, i.e. those that deviate from the linearity, to correct the errors that always happen when we perform a motion tracking (jumps). It can be a long and tedious job, but it leads to good results.
- It is not possible to switch Motion cache off. While working, Motion always looks in its cache. If it contains some data assigned to the current frame numbers, that cached data will be used unconditionally. If not, that data will be calculated, stored in the cache, and later reused, also unconditionally.
- In the Motion plugin dialog there is a button Clear tracking file contents. When in doubt, you can press this button, the cached data will be erased and fresh recalculated on the next pass.
- It is quite usual to wish independent caches for different parts of video. It is possible to set such distinct cache file names (either manually, or let software generate them with Generate tracking file name). When you generate new names, the plugin automatically switches Calculation off, just for security. You switch it on again when needed.
- If play track is switched off for the track where the Motion plugin was attached, the plugin will calculate nothing. Also, if Play every frame was not active in Preferences, some video frames can get skipped from processing.
- You can try tracking using reverse playback of the track. Sometimes it may lead to a better calculation.
Footnotes
- 12
- credit Georgy (sge)
- 13
- credit Pierre Marc Dumuid
- 14
- Thanks to Georgy
The CINELERRA-GG Community, 2021
https://www.cinelerra-gg.org