Subsections
Motion51
Note: Motion and Motion51 plugins are complex and slow to use for video stabilization. If you are stabilizing an entire video, you may want to preprocess by using ffmpeg's vidstabdetect and vidstabtransform plugins before importing the video into CINELERRA-GG.
This plugin compensates for unwanted motion and stabilizes the picture. The Motion51 Plugin simplifies motion stabilization so that without a lot of tweaking you can easily achieve reasonable results, either by using the defaults or varying a single parameter. Since the motion in every clip is specific, there are some additional parameters useful to adjust the settings accordingly.
The Motion51 plugin uses different methods for tracking than the other motion plugins. Motion Stabilization is very useful if you have jittery video, for example when taken from a car window, or while walking.
The better results require more samples. Setting the sample set size is probably the most important setup change. Also, when computing motion compensation, the entire history of the image motion is important, and so it is desirable to enable the playback setting play every frame in order to get good results. When every frame has to be processed, it can be time-consuming. Reasonable results are possible with small sample sets. After setup, the sample size can be increased to produce a high quality rendered result.
Description of what the program is doing
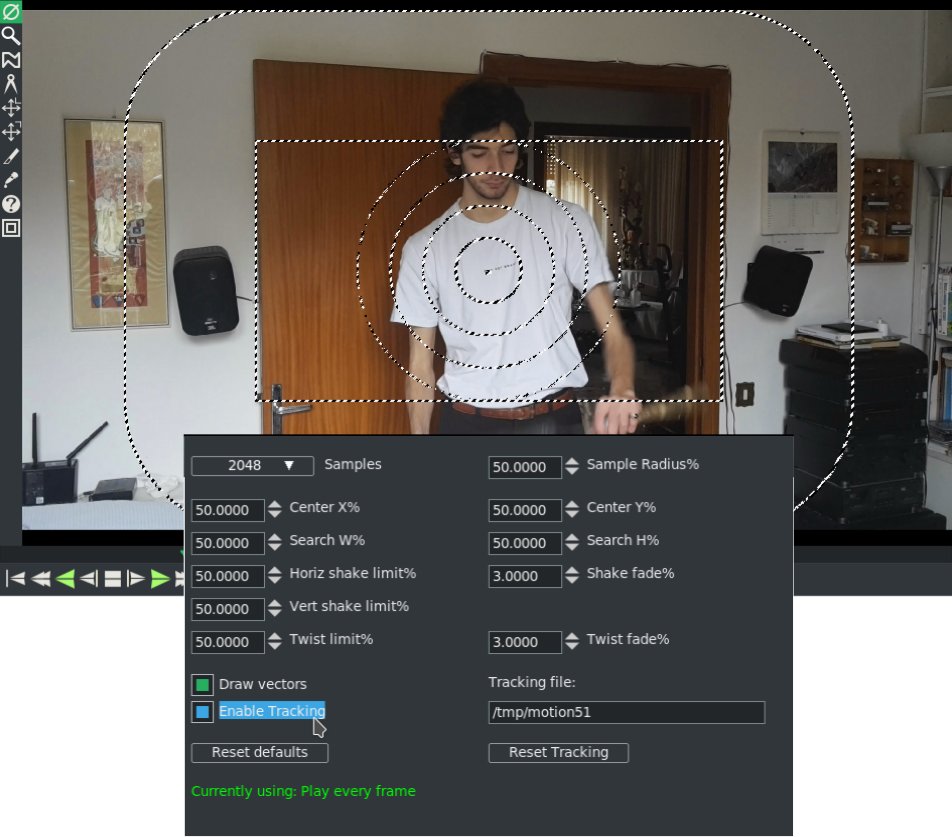
The motion is detected by sampling the video image in a circular field. This size and placement of the sample region defaults to most of the image area. When the draw vectors feature is enabled, the outer line trace encloses the searched region. The dotted circles define the target pixel set as the reference sample. The image is sampled using the circle pattern in a grid search. The best match is used to find the center and amount of rotation to transform the current image so that the reference area motion is canceled.
The amount of sampling does not significantly change for smaller or larger search areas. This means that a wide area can be searched just as easily as smaller areas. The main parameter which determines how hard it looks at the image is the samples parameter. It represents the number of possible rotations, as well as the search precision. More samples mean more precision, and less jitter, but the program will run more slowly (figure 10.56).
Figure 10.56:
Motion51 plugin window with its default options set.
|
|
The Samples box at the top is most often the only parameter that you may want to vary.
Program Parameters Description follows
- X11-OpenGL:
- setting can speed up the computation significantly in some cases when hardware OpenGL is available.
- Samples:
- is the number of pixels which the software will examine to stabilize the picture. The sample set is arranged in 4 equal concentric circular sets. Each sample dot represents content and position for a pattern matching test. Setting the samples to larger values improves the match by adding lots of placement possibilities. The samples/pixels that will be utilized are distributed throughout the selected area – this is seen within the circles drawn when Draw Vectors is enabled. See figure 10.56.
- Draw vectors:
- demonstrates the search operation of motion stabilization. When enabled, the outer search boundary (oval), the search grid area (rectangle), and the reference sample (circles) are visible. 4 concentric circles show the reference sample set (target). You will also see an arrow in the center of the circle which shows each image displacement from frame to frame. When you render the video using the motion plugin, these dots/lines/circles are drawn into the rendered output. Draw vectors helps to visualize the meaning of the parameters to aid in setup. You should disable Draw Vectors before the final rendering.
- Sample Radius:
- is the radius of a circle that denotes the area of the sample locations. It is expressed as a percentage of the smallest image edge. For example, if it is set to 50%, then the circle will overlap about
 of the image. This does not change the number of samples. It does change the area from where the samples are gathered. If you have Draw vectors on, you can see the faint outline of a circle used for the radius.
- Center X/Y:
- is the center position of the sample circle, as a percentage of image width and height.
This is useful to reset the reference focal point in cases where the important feature target is off-center.
When both X and Y are set to 50%, the samples will be used from around the center of the video.
- Search W/H:
- determines the width and height of the rectangular area used for the grid pattern search. Samples are taken by moving the center of the circles in a grid pattern.
- Horiz/Vert shake limit:
- (Shaking refers to image translation) determines translation constraints. If the motion determined by the search exceeds the limit, it is clipped to a value that is at the limit boundary. For example, if the match indicates that the motion is 60% off the reference target, but the limit is 50%, then the actual translation used will be limited to only 50%.
- Shake fade:
- determines how fast the translation cancellation fades away, and the image resettles to its actual appearance. Every frame that is processed accumulates the motion of the past. The amount of the past motion which is applied is reduced by the fading factor. The current match is then added to the fading past motion history. Fading works fast. It is applied every frame. So if fade is 10%, and no new motion occurs in the input, the history will be
90%, 81%, 73%, 66%... and in 30 frames only 4.2% of the past motion will be present in the effect. Fading insures that the image will eventually settle re-centered when the image motion ends.
- Twist limit:
- (Twisting refers to image rotation) determines the rotation constraints. If the rotation determined by the search exceeds the limit, it is clipped to the limit boundary. Its operation is similar to the shake limits.
- Twist fade:
- determines how fast the rotation cancellation fades away, and the image resettles to its actual appearance. Its operation is similar to the shake fade.
- Enable Tracking:
- caches the search results in a file so that subsequent playback does not have to be recalculated. When tracking is enabled, before a frame is processed the frame number is used to look for cached results. If cache data is available, it is used. If no data is available, the frame is processed by the motion tracking search, and the results are added to the cache file. If tracking is not enabled, the data is always sourced from the motion tracking search and the tracking file is not updated.
- Tracking file:
- is the name of the file which will contain the calculated values to be saved. Note that the default is /tmp/motion51 which can be hazardous, since a system crash or a reboot can delete /tmp files.
- Reset Defaults:
- button is used to revert to the initial defaults built into the program.
- Reset Tracking:
- will delete the current Tracking file and disables tracking so that any previously calculated values are no longer available. However, because motion stabilization can often be cpu intensive, if the default file already exists, it will create a file name from the loaded asset.
- Play Every Frame:
- shows if you are Currently using: Play every frame. For best results, set play every frame. This can be set in Settings
→ Preferences
→ Playback A Tab in the Video out section.
The CINELERRA-GG Community, 2021
https://www.cinelerra-gg.org