Record Web Media in real-time
Below describes the necessary steps for recording freely available media from the internet for your own personal use. You have to be on a system using pulseaudio, such as ubuntu, fedora, or centos.
- Start CINELERRA-GG and select Settings
→ Preferences
→ Recording From a terminal (with a wide text window) run: pactl list. You will see all of the audio sources and sinks on your system. Identify the source associated with the normal output your system uses. Example: Source #1. Locate the source which monitors your normal audio output. For example: front stereo.
- Choose a File Format and File Type (for example: FFMPEG & qt).
- Check Record audio tracks.
Click Audio wrench tool:
- Select mp4, for example.
- Set Bitrate (256000 is a reasonable number).
- Check Record video tracks.
- Click Video wrench tool:
- Select mp4 video, for example.
- Set Bitrate
1000000 - 4000000 (bigger=better, but more cpu)
- Select Audio In
→ Record Driver: ALSA (or whatever you have instead)
- Set the Bits: 16 Bit Linear (probably, because reasonable and fast)
- Select Device: the source from above pactl list search, for example Source #1
- Samples read from device: aprox dev buffer size (2k - 16k probably)
- Samples to write to disk: 131072 (a good size)
- Sample rate for recording: 44100 (will automatically change)
- Channels to record 2 (probably)
- Uncheck Map
5.1→2
- Gain 1.0
- Select Video In
→ Record Driver: Screencapture
- Set the Display: leave blank (probably) or use ": 0.0" (default screen/display)
- Frames to record to disk at a time: 30 (a good number)
- Frames to buffer in device: (2 - 6) (probably)
- Positioning: Software Timing (important)
- Uncheck: Sync drives automatically
- Size of captured frame: 720x480 (this is your choice, actual capture size; 600x320 youtube)
- This defines a screen capture rectangular area on the display.
- Try to make it the size you need to cover the screen playback area.
- Frame rate for recording 23.97fps (a good choice, not all choices work)
- OK
When recording from the screen, a large green-colored boundary box appears to allow you to easily frame the screen area to be recorded when you move it around to where you want to position it. In addition there are record cursor and big cursor check boxes which allow for also recording the cursor and for making the cursor bigger.
You can see the bright green boundary box and these checkboxes around the middle at the top in
figure 13.1.
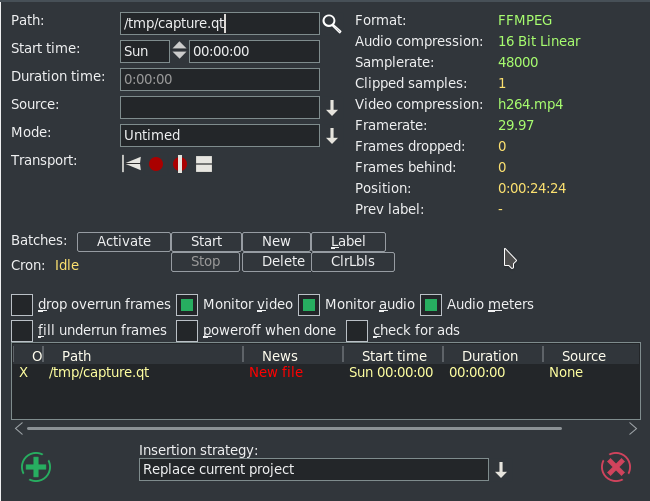
Screenshot to illustrate some appropriate settings which are described above/below the image (figure 13.2).
Figure 13.2:
Recording window with typical settings
|
|
- Make sure the Compositor window is up since you will want to see the captured media later. From the main window press (lower case "r") (move windows and resize if needed) Using the mouse pointer, mouse over the Video In Recording monitor display. Press and hold the left mouse button and drag the display until the desired target screen capture area is properly positioned inside the record monitor Video In display. At first this may seem confusing, but keep in mind that what you are actually doing is positioning the portion of your monitor display you want to capture over the Video In window.
- From the Recording window select a Path file name for the recording.
- Select mode untimed.
- Make sure the monitor audio is unchecked else audio becomes looped and is very loud.
- Press Transport start recording (red circle button).
- Operate the playback of the media source, i.e. start playing the web video.
- When the media ends, stop on the playback application.
- Press Transport stop recording button (white square button).
- Before clicking chk-Ok, be sure to set the Insertion Strategy.
- Press chk-Ok to review the capture, or "X" to cancel/dismiss application.
Two things are happening during recording, the data is being written, and it is being rendered. When recording, if video and audio are not in sync, it will usually be video behind audio as opposed to the other way around because video is more difficult to decode. During recording, video frame and audio sample positions are checked and efforts to maintain synchronization are used. Below is an explanation for some of the less obvious settings for recording as shown in the previous screenshot.
more input than cpu(s) can process. This is the number of frames dropped when the system is too slow to keep up with the video. This value serves as a warning that it is behind and is dropping frames to keep up. You might want to consider stopping to make some parameter adjustments and start over to reduce drops.
active input buffers. This is the number of frames that the video is behind and it will drop frames to get caught up. Frames behind depends on the synchronization source, for example, time as the synchronization. This means that frames are not being written as fast as they are being captured and can occur when the system is too slow to keep up. This situation can happen with older systems or cpus where there is more input then can be processed in a timely manner. So that when there are Frames behind, frames will be dropped.
The algorithm for determining how many frames to drop is as follows:
- If the number of frames behind > 3, only 3 frames will be dropped before it will then do 1 frame;
- if the number of frames behind is 2, only drop 1 frame;
- if only 1 frame behind, no frames will be dropped.
checkbox when enabled, frames will be dropped. Drops occur when you capture a frame and there is no storage space available to save it, usually because buffer space is exhausted. This situation can occur when there are too many frames coming in too fast and the I/O system is not keeping up in emptying the buffers.
checkbox if enabled, duplicate last frame when no input frame ready for output. As the tooltip states write extra frames when behind. This is desirable in order to keep audio and video synched with regards to sample and frame rates. Use underrun padding to fill frames when the input capture rate is lower than the output frame rate. Since demand is constant, you have to output something, so the last frame is duplicated as many times as needed to keep up. You should stop and adjust the frame/sample rates to match the input if not filling underruns, then start over. This situation can occur if the input stops for some reason like lightning interrupts the signal or the internet connection is too slow.
these control buttons mimic the functions of tape recorders from the old days.
- Reverse button/left arrow – remnant from the past; does the same as the Start button really.
- Red round button – this is the Start button to start recording.
- White square – this is the Stop button to stop recording.
- Red round button with white line – start recording in single frame mode. The way this works is to just take a picture now, take a picture now... The reason to use this mode is to get a still shot like you would with a camera. Sometimes input is continuous, for example looking at stars with a telescope – surveillance goes on for hours, but you just want to take a picture now when something of significance interest comes up
The batch recording watcher, cron, is either Idle or Active. When you start or stop batch recording at specific times, there is a cron thread watching timers to perform the timed action. Idle/Active indicates whether the timers are running.
this is a timebase which tracks frames/samples when obeying frame/sample rate. When a recording starts, it resets to 0. Timing is against audio (when available). Audio time and video time are based on position.
You can select synchronization time source Positioning in:
Settings
→ Preferences under the Recording tab.
Possible choices for time base are:
- Presentation Timestamps – use time code which is in both the audio and video media input stream. Uses these timestamps to sync the 2 streams.
- Device Position – this is the device hardware position of where you are. It is usually only on the audio side.
- Sample Position – Sample # or frame # divided by frame rate tells you where you are.
- Software Timing – usually used for things like YouTube; it just will take a picture now ...take a picture now ...over and over again until you tell it to stop.
Positioning & Timing needs more detailed explanation for complete understanding and application. The overall goal is to maintain media stream timeline synchronization. The reason for providing different Positioning options is that different input media may have different timebase standards. Additionally, the input may be damaged. Damaged data can skew the timeline during presentation. The timebase standards make it possible to correctly resynchronize the media presentation to the original time position. For example, the transport layer may have timestamps provided in it. These timestamps record audio time and video time and are called presentation timestamps.
The kind of positioning used depends on the input device and the media format. In the transport stream example, the media has already been coded at least once as a stream and contains position information. In other situations, sample position or device position can provide timeline position. If the input device provides data at a variable or asynchronous rate, then software timers can provide timeline position. Sample position is position from the perspective of software, and device position is position from the perspective of hardware. The difference is buffer time. Device position is usually more accurate, but may not be available, or may contain errors.
Examples of media which usually has a particular type of positioning is:
- mpeg has timestamps therefore Presentation Timestamps is a good recording choice;
- raw media streams/screen capture have no timestamps, so tell it time via Software;
- a web cam may supply data at variable rates, so again you would use Software timing;
- an example of Device Position is audio (timestamps can come off the device);
- if Software Positioning working for you, try Sample Position for really bad audio.
Other Recording settings are more pertinent to capturing and editing broadcast television with all of its many commercials. Their usage will be explained in more detail in a later section.
create a label. During capture, put a time marker at the designated spot. When the recording
gets pulled in later for review, you will see a green arrow marking the spot that was clicked.
clears all of the previously set labels.
check for commercials. In real time, labels are added when a commercial that matches
a previous ad is already in the database (the TDB, Traveling Data Base).
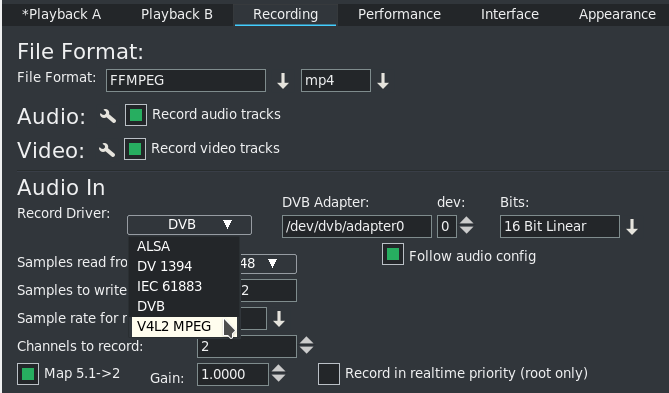
One other noted new feature is a new choice for recording - V4L2 MPEG. Some digital tuners now stream mpeg data for broadcast data streams. V4l2 has been upgraded to be able to process data from these device streams. Figure 13.3 shows the available options to include v4l2 mpeg.
Figure 13.3:
new feature V4L2 mpeg
|
|
Some notes for usage on slower CPUs are outlined at appendix Using Screen Capture on slower CPUsas discovered in actual usage.
Subsections
The CINELERRA-GG Community, 2021
https://www.cinelerra-gg.org