Compositor Toolbar

On the left hand side of the Compositor window, there is a toolbar with several icons that provide functions for viewing and compositing the video. Each of these operational features will be described in more detail next.

Protect video from changes
this option makes it possible to disable changes to the compositor output when clicking on the Compositor window. It allows for using the Click to play button (when enabled) for simply starting and stopping play. It helps to prevent an accidental click from making unwanted changes. When you enable this option, any of the other enabled tools will automatically be disabled.

Zoom view / magnifying glass
when enabled, the Zoom view immediately results in the addition of a zoom slider for fine viewing. The vertically oriented zoom slider will be displayed underneath the last icon of the toolbar and extends to almost the end of the toolbar. The slider allows for adjusting the amount of zoom at any level between 0.01 and 100 based on a logarithmic scale.

When using the zoom slider, the number by which the view is zoomed can be seen in the textbox on the bottom controls where the % zoom is located. The zoom slider size is in the form of times, such as ×0.82 which indicates that the picture is zoomed to ${\frac{{82}}{{100}}}$th of the original size as seen in the Settings Format menu. Once you have set the zoom to the desired size, use the vertical and horizontal scroll bars to position the view as needed. As mentioned earlier, this variety of zoom only affects the video and not the resizing of the Compositor window. After utilizing this slider bar for zooming around, you may want to switch back to Auto using the controls on the bottom of the window. This slider bar is also displayed when you click on the icons for Adjust camera automation or Adjust projector automation.

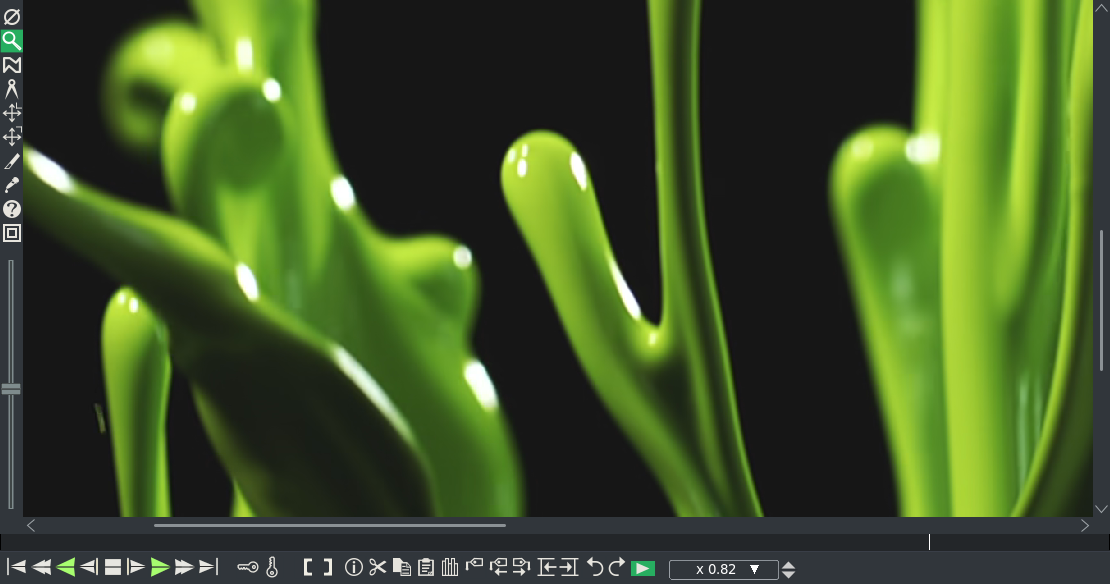
The Compositor window image in figure 2.10 shows the zoom slider bar with rectangular shaped slider about in the middle. Note that the magnifying glass is enabled which automatically pops-up the slider and the Protect video from changes is disabled. Also note that there is a scroll bar on the bottom and right side of the image since the image at this magnification does not fit in the window. The Controls zoom textbox shows ×0.82 size.

Figure 2.10: Compositor window zoom slider bar and scroll bars
Image zoom_slider
Edit mask
brings up a mask editing menu with many versatile options as described in great detail later in this section (2.2.6). You may also have to click on Show tool info to popup the menu depending on whether or not you dismissed that window previously.
Ruler
this can be a handy tool to get the X,Y coordinates of an exact point or to measure the distance between 2 points. To use the Ruler, move the mouse on the video to get to the desired spot - these X,Y coordinates will be displayed in the Current text box. Clicking the LMB creates Point 1 and then continue to hold down the LMB so that a ruler line is created between this Point 1 and the stopping Point 2. Deltas is the X,Y difference between the 2 points; Distance is the number of pixels between the 2 points; and Angle is the angle in degrees of the ruler line. In Figure 2.11 you can see the Ruler menu on the right side of the Compositor window.

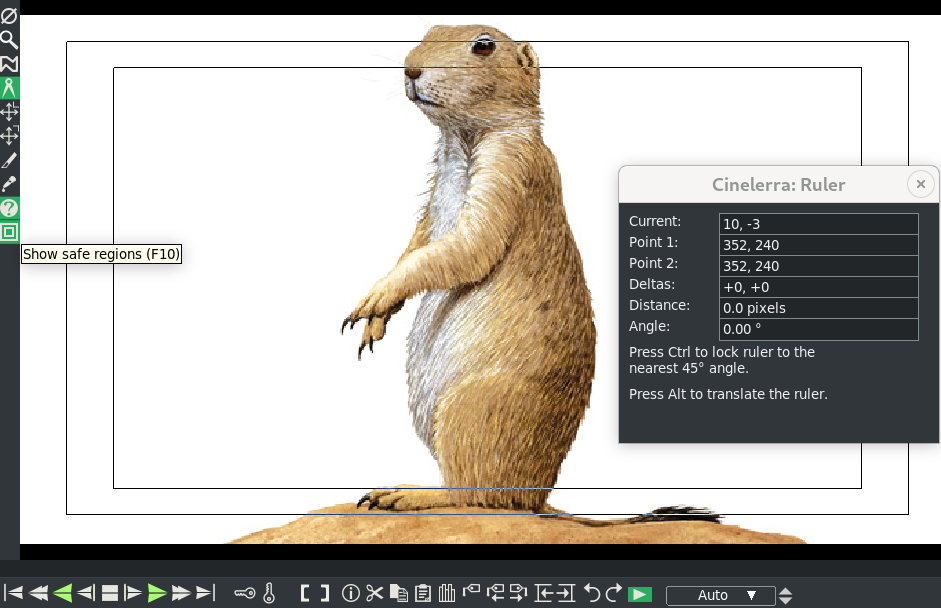
Holding down the Ctrl key while dragging with the LMB on one of the points, will ensure that the line is always at a multiple of a 45 degree angle. Holding down the Alt key while dragging with the LMB on any of the points, will translate the ruler line to another place on the video while maintaining its length and angle. For some desktop window managers, such as UbuntuStudio 16.4 and Arch, the Alt key is already in use by the Operating System so you will have to use Alt+Ctrl instead. If you dismiss the Ruler menu, click on Show tool info to get the menu to popup again.

Adjust camera automation
the camera brings up the camera editing tool. Enable Show tool info if the popup menu does not appear. More detail for usage is provided in the subsequent section 2.2.5.
Adjust projector automation
the projector brings up the projector editing tool. Enable Show tool info to get the menu to popup again. More detail for usage is provided in the subsequent section 2.2.5.
Crop a layer or output
this is a cropping tool used to reduce the visible picture area. More detail for usage is provided in a subsequent paragraph (2.2.7). There is also a Crop & Position plugin that provides a different set of capabilities described in 10.10.18. Enable Show tool info to get the menu to popup if it does not come up automatically.
Get color / eyedropper
brings up the eyedropper used to detect the color at a particular spot. Enable the Show tool info if the Color popup menu does not come up automatically or if that menu was accidentally dismissed. Click on a specific color in the video output with the LMB to see the selected color. You can then use that color's value to be applied to some effects depending on how the effect handles the eyedropper. If you set the Radius to a larger number, a square appears around the cross cursor and an average value of the color will be the result. If you Use maximum, instead of an average value of the color, the result will be the maximum of all values within that square.
Show tool info
this tool button is used in conjunction with the other tools on the compositor's toolbar. You only need to click on this if one of these tools popup menu does not come up or has been dismissed - Mask, Ruler, Camera, Projector, Crop, or Eyedropper tools. You can also use it when highlighted to dismiss the highlighted tool's dialog box. It is not needed for Protect video from changes, Zoom view, and Show safe regions since they have no dialog popup menus.

Figure 2.11: Note the black outlines showing the safe regions. Also note the Ruler menu
Image safe_regions

Show safe regions
draws 2 outlines to display the safe regions in the video as you can see in Figure 2.11. On some particular TVs/monitors/displays, the borders of the image are cut off and that cut off section might not be as square as it appears in the compositor window. These are especially useful if the device for the output display is an older model TV. The outside largest outline is the action safe overlay; whereas the inside smallest outline is the title safe overlay.

Using the Show safe regions has no affect on the rendered output. The purpose of showing the borders is to make it easy to see where it might be cut off. This area outside the safe region can then be used as a scratch or vertical blanking space. Enabling the safe regions makes it really easy to see these borders so that you can make sure titles are inside the inner outline and actions are inside the outer outline.

The CINELERRA-GG Community, 2021
https://www.cinelerra-gg.org